

Tuesday, July 31, 2012
Sterling Silver and Copper Wire Bangle
Monday, July 30, 2012
Enameling and Decals
I also played around with some ceramic decals while enameling this week.
For the first project, I chose a rosy pink color to enamel a copper flower, and then applied a heat-tolerant decal - the word "bloom".
The second piece is a copper bead, which I enameled blue, then applied a few pink millefiore wafers, and then some really pretty floral decals - pink roses with greenery.
Before firing (sorry about the dreadful reflections):

After firing:

For the blue bead, I overlooked the fact that while these ceramic decals are built for firing, they tend to diffuse in the intense heat. My pretty, delicate rose decals turned into abstract maroon and green blobs - but I really like them. I'm more of an abstract girl than a floral girl anyway!
The flower turned out well - the black ink on the decal turned henna during firing, and the flower itself developed some nice scarlet freckles!
Not sure there's a future for decals in my torching. I'm not into the cutesy floral/girly decals, nor the inspiration word decals. But the technique is easy (gotta watch the heat, though) - so if I can find some decals that suit me, I'll do this again!
Sunday, July 29, 2012
Liquid Enamel
I played around with liquid enamel this week.
For these beads, I first applied the background blue enamel through torch-fired immersion. Then, using white liquid enamel, I painted (and I use that term loosely) some semi-floral bead cap shapes at each end of the beads around the holes. The enamel takes a long time to dry (24 hours) - and I could only paint one end of the bead at once, because in the process of flipping the mandrel to paint the other end, if the enamel wasn't dry, I just succeeded in smearing all the enamel I had just lovingly applied! Not that I actually did that, or anything - I mean, in THEORY that's what would happen. So it took a couple of days to get my floral "beadcaps" painted on.
Then, the blobby floral beadcaps looked too un-matchy and blobby, so I decided to further call attention to them by dotting them with sunny yellow liquid enamel, which also had to go through prolonged drying. And once dry, the application was too light, so I had to repeat it, several times. Then I added some yellow polka dots around the circumference of the bead, which also took several applications and prolonged drying time.
So what I'm trying to say is it took about 6 days to get to this point: this is how the beads looked BEFORE firing in the torch (The squarish bright white spots on the blue beads are reflections from my overhead lights):

And here is how they look after firing:
 My nice, thick, even application of yellow enamel is now very uneven, thin, and splotchy, but I actually like it! The white enamel also got bubbly and spotty. And the most interesting part was watching these fire: the yellow enamel actually caught on fire and then smoldered throughout the firing, like little embers on each bead - it was fascinating!
This was fun, but pretty labor and time intensive, so I'm not sure I'll do it again - at least not in this fashion, since my painting skills are basically nonexistent!
This is a pendant I did with liquid enamel - I may have already shown it, but here it is again:
 Where you see the orange circle? That's where I painted on a thick circular glob of white liquid enamel, and then sifted orange enamel onto it (after the whole piece had been fired blue!) - then I let it dry. During firing, the point was to let the white liquid enamel bubble up and start showing through the orange, and you can see a little of this near the pendant's hole. I could have achieved a more bubbly result if I had held the mandrel in the flame longer, but my neck and arm were getting too sore - so I quit.
In contrast to the painted beads, I will probably repeat this technique. It was fun, and it turns out I am REALLY good at painting blobs!
For these beads, I first applied the background blue enamel through torch-fired immersion. Then, using white liquid enamel, I painted (and I use that term loosely) some semi-floral bead cap shapes at each end of the beads around the holes. The enamel takes a long time to dry (24 hours) - and I could only paint one end of the bead at once, because in the process of flipping the mandrel to paint the other end, if the enamel wasn't dry, I just succeeded in smearing all the enamel I had just lovingly applied! Not that I actually did that, or anything - I mean, in THEORY that's what would happen. So it took a couple of days to get my floral "beadcaps" painted on.
Then, the blobby floral beadcaps looked too un-matchy and blobby, so I decided to further call attention to them by dotting them with sunny yellow liquid enamel, which also had to go through prolonged drying. And once dry, the application was too light, so I had to repeat it, several times. Then I added some yellow polka dots around the circumference of the bead, which also took several applications and prolonged drying time.
So what I'm trying to say is it took about 6 days to get to this point: this is how the beads looked BEFORE firing in the torch (The squarish bright white spots on the blue beads are reflections from my overhead lights):

And here is how they look after firing:

This was fun, but pretty labor and time intensive, so I'm not sure I'll do it again - at least not in this fashion, since my painting skills are basically nonexistent!
This is a pendant I did with liquid enamel - I may have already shown it, but here it is again:

In contrast to the painted beads, I will probably repeat this technique. It was fun, and it turns out I am REALLY good at painting blobs!
Saturday, July 28, 2012
Did you hear it?
Yesterday, around 5PM, I breathed a BIG sigh of relief - did you hear it?
 I'm participating in the Bead Soup Blog Party Swap again, and I've had my generous soup mix for several weeks, and have been really stressing about how to bring it all together. According to the rules of the swap, I have to use a focal, a clasp, and some of the beads, and I was really struggling to come up with an idea that would incorporate all 3, because I didn't want to design one piece for the focal, one for the clasp, and yet another to use the pretty beads! That's crazy talk!

Every few days I would pull out the box, remove the contents, push stuff around, get frustrated, and put it off to another day. But I'm running out of days!
I'd worry about it at home, wake up at night with possible ideas, shoot down my ideas when I arrived at my work space, then lather...rinse...repeat. This is how I was starting to feel:
 I decided to try again yesterday, with a determination to really dig in, focus, and not give up until I had a plan! And finally, it started to come together.
Mind you, I haven't actually designed anything - haven't even made any sketches, but I have a workable idea in mind, and that's enough for now!


Every few days I would pull out the box, remove the contents, push stuff around, get frustrated, and put it off to another day. But I'm running out of days!
I'd worry about it at home, wake up at night with possible ideas, shoot down my ideas when I arrived at my work space, then lather...rinse...repeat. This is how I was starting to feel:

Mind you, I haven't actually designed anything - haven't even made any sketches, but I have a workable idea in mind, and that's enough for now!
Friday, July 27, 2012
Teal and Cream Lampwork Earrings

Thursday, July 26, 2012
New Enameled Pendants
Here are a couple of enamel pendants - I've been playing with some new techniques this week.
 This one has lots of millefiore and stringer, and I raked through the hot stringer with a mandrel. The pendant's hole is a little off center, but for some reason it is way more obvious in pics - maybe the extreme macro (?) than it is in real life.
 More millefiore and raking, and this one got a bit overfired. It used to be a pretty lilac color, and now it is a deep metallic olive green - but I like this distressed look!
 I painted this pendant with liquid enamel, and then sifted orange enamel onto the wet liquid. Once it dried, I placed a millefiore disc in the middle, and layered some stringer randomly over the top, then fired.


Wednesday, July 25, 2012
Wednesday Worktable
More Do-Overs!
 On the left, an onyx necklace; the beading wire broke in the middle (the necklace got caught on something).
On the right, a multistrand ceramic and glass necklace, with missing parts.
I'm also working on Bead Soup projects, but can't show them yet!

On the right, a multistrand ceramic and glass necklace, with missing parts.
I'm also working on Bead Soup projects, but can't show them yet!
Tuesday, July 24, 2012
Copper and Sterling Silver Chainmaille Bracelet
I was dying to use these triangular copper and sterling silver beads - I loved mixing metals, and I love the shape and texture of these great beads!
I designed this Byzantine chainmaille bracelet with a mix of sterling and copper jumprings:
 And look how the toggle matches!
It's available on Etsy!
I designed this Byzantine chainmaille bracelet with a mix of sterling and copper jumprings:

It's available on Etsy!
Monday, July 23, 2012
Dainty Green Earrings

Sunday, July 22, 2012
Brown Swirl Glass Earrings

Available on Etsy.
Saturday, July 21, 2012
Blue Diamond Chainmaille Earrings
These diamond-shaped chainmaille earrings were created with blue niobium jumprings. They are so slinky - they move like waves on the water. Love them!

And they're available on Etsy!

And they're available on Etsy!
Friday, July 20, 2012
Elegant Black and Crystal Bracelet


It's available on Etsy!
Thursday, July 19, 2012
I found a little playtime yesterday!
I survived yesterday at the shop - and that is a big deal. Wish I could say why, but I'm letting tact win the day here.
After I finished teaching the stringing class, I set up my torch and started experimenting with different enamel color combos and techniques:
Here are a few beads I sifted a second color onto:

The raspberry on clover is a gorgeous combination, and doesn't show off well in these pics. I liked the effect of the striped band around the middle of the bead, and can achieve it a lot better with sifting than I can with rolling the bead in enamel.
Next I opened up some filigree beads, turning them into floral bead caps, then enameled them with one color, followed by dipping them into a second color to coat their tips.

I tried several different combos, and haven't yet hit the one I want to use for a floral necklace. Maybe today, if I have time!
I hope I don't regret not devoting this spare time to my Bead Soup!
After I finished teaching the stringing class, I set up my torch and started experimenting with different enamel color combos and techniques:
Here are a few beads I sifted a second color onto:

(l) t. raspberry on white, (r) t. raspberry on clover
Next I opened up some filigree beads, turning them into floral bead caps, then enameled them with one color, followed by dipping them into a second color to coat their tips.

" fantasy flowers" a la Barbara Lewis
I tried several different combos, and haven't yet hit the one I want to use for a floral necklace. Maybe today, if I have time!
I hope I don't regret not devoting this spare time to my Bead Soup!
Wednesday, July 18, 2012
Wednesday Worktable
The worktable is pretty boring today: repairs. Y'all know I hate the do-overs.

The 2 bracelets at the bottom right need to be restrung (and half the beads were lost from the amethyst one - I was to miraculously pull matching ones out of my ..... HAT .... to supplement!) - anyway, just finished those. How often do you guys run into folks that think that just because you make jewelry, you have an endless supply of every single bead, component, and finding in the whole world in your magic jewelry supply box? Crazy!
The necklace at the upper left is next. It was made for my customer by her 8 year old granddaughter. I'm supposed to 1) restring it, so it can actually be worn, and 2) shorten it about 6 inches, but 3) disguise my "do-over" so the granddaughter can't tell it's been restrung. Um....okaaaaay.
This is what the ends of the necklace look like right now:
 Big knots are tied right next to the last shell bead, then there are about 2 inches of bare tiger tail, and then another knot secures the tiger tail to the clasp (2 lobster claws). I actually see this type of finishing fairly frequently on repairs!
I also have to teach a stringing class today, so I don't get to do much fun me-stuff today.
:(

The 2 bracelets at the bottom right need to be restrung (and half the beads were lost from the amethyst one - I was to miraculously pull matching ones out of my ..... HAT .... to supplement!) - anyway, just finished those. How often do you guys run into folks that think that just because you make jewelry, you have an endless supply of every single bead, component, and finding in the whole world in your magic jewelry supply box? Crazy!
The necklace at the upper left is next. It was made for my customer by her 8 year old granddaughter. I'm supposed to 1) restring it, so it can actually be worn, and 2) shorten it about 6 inches, but 3) disguise my "do-over" so the granddaughter can't tell it's been restrung. Um....okaaaaay.
This is what the ends of the necklace look like right now:

I also have to teach a stringing class today, so I don't get to do much fun me-stuff today.
:(
Tuesday, July 17, 2012
Enameled Bar for Copper Toggle
Reminder: This is the copper toggle I sent my BSBP partner, Kate.

Yesterday, I ran down the steps that went into the creation of the toggle ring.
To make the bar for the toggle I used some of the same steps, so I'll just be listing these, rather than describing them again - please refer to yesterday's tutorial if you need more detailed info!
1) Create a paper template for the toggle bar. I draw what I have in mind on some scrap paper, cut it out, and then see if it works the way I want it to - Right size, shape, etc. My paper templates have saved me from wasting a lot of metal!
2) Draw the desired bar shape on 24g sheet copper (with a fine-tipped Sharpie). Cut the shape out with metal shears or a jeweler's saw.
3) Punch or drill a hole where you want to attach the ring. I chose the center for this bar.
4) File/sand all the rough edges
5) Tumble the bar to harden and polish it (the polishing won't be visible after enameling, but the surfaces will be much more smooth than you could achieve by filing and sanding! Tumbling is your friend!
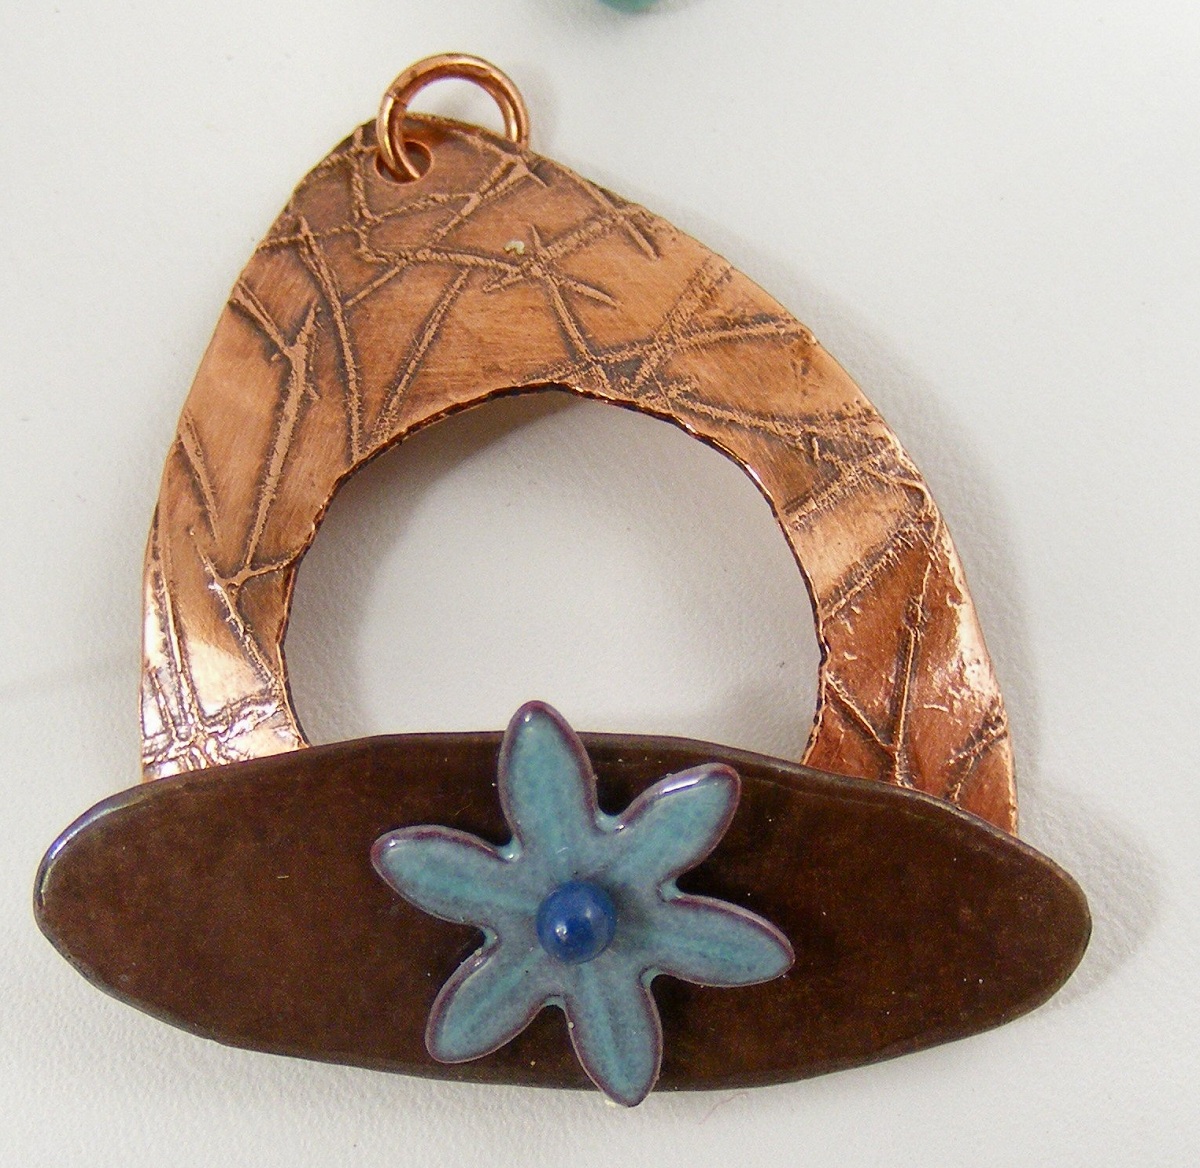
6) I knew I wanted to enamel the bar in the same brown as the enameled beads I sent Kate, but I decided to add a little blue embellishment in the form of a copper flower. I set up my enamel immersion torch-firing station, used brown enamel for the bar, then enameled the flower. Then I drew a bead on a piece of 20g copper wire, and enameled the resulting head pin in a darker shade of blue.
7) Assemble the bar - I put the headpin through the flower and the bar, and made a wrapped loop on the back.
I'd love some opinions on this toggle ring and bar combo - I wanted to make the toggle match the beads I sent Kate, but I wanted the gorgeous details and texture from the etching process to show, so I decided to leave the ring etched, and enamel the bar to achieve the matching colors. So the bar and ring don't really match each other, but I often will make a beadwoven toggle bar and use it with a Swarovski crystal, or use unusual found objects as toggle bars, so my toggle components frequently don't match each other. As long as they complement the overall design, that's what it's all about for me!
How do you feel about the components not matching? What kind of "unmatchy" clasp components have you used?

Yesterday, I ran down the steps that went into the creation of the toggle ring.
To make the bar for the toggle I used some of the same steps, so I'll just be listing these, rather than describing them again - please refer to yesterday's tutorial if you need more detailed info!
1) Create a paper template for the toggle bar. I draw what I have in mind on some scrap paper, cut it out, and then see if it works the way I want it to - Right size, shape, etc. My paper templates have saved me from wasting a lot of metal!
2) Draw the desired bar shape on 24g sheet copper (with a fine-tipped Sharpie). Cut the shape out with metal shears or a jeweler's saw.
3) Punch or drill a hole where you want to attach the ring. I chose the center for this bar.
4) File/sand all the rough edges
5) Tumble the bar to harden and polish it (the polishing won't be visible after enameling, but the surfaces will be much more smooth than you could achieve by filing and sanding! Tumbling is your friend!
6) I knew I wanted to enamel the bar in the same brown as the enameled beads I sent Kate, but I decided to add a little blue embellishment in the form of a copper flower. I set up my enamel immersion torch-firing station, used brown enamel for the bar, then enameled the flower. Then I drew a bead on a piece of 20g copper wire, and enameled the resulting head pin in a darker shade of blue.
7) Assemble the bar - I put the headpin through the flower and the bar, and made a wrapped loop on the back.
I'd love some opinions on this toggle ring and bar combo - I wanted to make the toggle match the beads I sent Kate, but I wanted the gorgeous details and texture from the etching process to show, so I decided to leave the ring etched, and enamel the bar to achieve the matching colors. So the bar and ring don't really match each other, but I often will make a beadwoven toggle bar and use it with a Swarovski crystal, or use unusual found objects as toggle bars, so my toggle components frequently don't match each other. As long as they complement the overall design, that's what it's all about for me!
How do you feel about the components not matching? What kind of "unmatchy" clasp components have you used?
Monday, July 16, 2012
Copper Toggle
This is the copper toggle clasp I sent Kate for our BSBP swap:
 I'm going to describe how I made the toggle ring today, and come back tomorrow to talk about the toggle bar.
Step 1 - decide on a rough shape, and draw it on 24g sheet copper:
 (I used a circle template to draw the inner ring.)
Step 2: Cut the piece out. I used metal shears to cut along the outer markings, and then used a jeweler's saw to pierce (saw) the inner circle:
 This is the piece, resting on my bench pin, which is clamped to my workbench. Don't forget to lubricate the saw blade!
After cutting it out, smooth any rough edges with a metal file or coarse emery board. This is also a good time to punch your hole for the attachment jump ring, and file off any resulting roughness.
3) Choose a design for etching into the metal. I have 50 or 60 to pick from, and this choice is always hard for me - I love them all! Once the design stamp is chosen, I stamp it directly on the metal, using Staz-On ink:
 The stamp I used is at the top right, and you can see the result on the toggle ring below it. I use my bench block as a stamping surface because it is hard, and it is flat and even. Any irregularities or "give" in the surface you are stamping on can sabotage the stamping effort, as the metal will bend away from you, resulting in an uneven stamping, or a smeared one. But the ink can be cleaned off with acetone, and you can restamp, over and over (not that I ever have to do this, LOL).
Let the ink dry. I'm never sure how long this really takes, and I try to plan for a 24 hour wait period here. But sometimes that plan fails, and I have etched as soon as 30 minutes later (when the ink is actually still smearable, so I know it isn't dry) and I have still achieved good results.
If your metal piece got bent in the cutting process, you'll need to flatten it before stamping - do this by placing it on the bench block and smacking it with another bench block (cover your ears first!) OR by placing it on the bench block, covering it with something spongy like a piece of foam rubber, and then smacking it with a rawhide mallet.
4) Etch! Place a piece of packing tape on the back of the piece you are etching. Place the piece face UP in a container of ferric chloride, just deep enough to cover the stamped surface. Adhere the free ends of the packing tape to the top edges of the acid container, so you'll be able to remove the piece from the acid without putting your fingers in it. Let it sit for 90 minutes.

The murky dark cloud in the center of the piece is the acid reacting with my copper toggle. You can just make out the packing tape curled up and stuck to the sides of the bowl.
5) Neutralize: Use the packing tape to lift the piece out of the acid and dunk it straight into a solution of baking soda and water. It will bubble - a few seconds is all you need. Then carefully remove the copper from the tape, and wash in soap and water. This whole step needs to be done with care - you don't want the acid on you, your clothes, or anything you care about, because 1) it's acid, and 2) it's a nasty permanent orange color. Even after it's neutralized, that orange color sticks around and will stain everything.

6) Use Liver of Sulfur to oxidize the ring, to give a little contrast in the etched recesses. This is completely optional, but gives the piece nice depth.
7) Dome the copper toggle ring if desired.
8) Add a jumpring. Tumble the piece to harden it and bring out a gorgeous shine.
 Tada!
Tada!
Step 1 - decide on a rough shape, and draw it on 24g sheet copper:

Step 2: Cut the piece out. I used metal shears to cut along the outer markings, and then used a jeweler's saw to pierce (saw) the inner circle:

After cutting it out, smooth any rough edges with a metal file or coarse emery board. This is also a good time to punch your hole for the attachment jump ring, and file off any resulting roughness.
3) Choose a design for etching into the metal. I have 50 or 60 to pick from, and this choice is always hard for me - I love them all! Once the design stamp is chosen, I stamp it directly on the metal, using Staz-On ink:

Let the ink dry. I'm never sure how long this really takes, and I try to plan for a 24 hour wait period here. But sometimes that plan fails, and I have etched as soon as 30 minutes later (when the ink is actually still smearable, so I know it isn't dry) and I have still achieved good results.
If your metal piece got bent in the cutting process, you'll need to flatten it before stamping - do this by placing it on the bench block and smacking it with another bench block (cover your ears first!) OR by placing it on the bench block, covering it with something spongy like a piece of foam rubber, and then smacking it with a rawhide mallet.
4) Etch! Place a piece of packing tape on the back of the piece you are etching. Place the piece face UP in a container of ferric chloride, just deep enough to cover the stamped surface. Adhere the free ends of the packing tape to the top edges of the acid container, so you'll be able to remove the piece from the acid without putting your fingers in it. Let it sit for 90 minutes.

5) Neutralize: Use the packing tape to lift the piece out of the acid and dunk it straight into a solution of baking soda and water. It will bubble - a few seconds is all you need. Then carefully remove the copper from the tape, and wash in soap and water. This whole step needs to be done with care - you don't want the acid on you, your clothes, or anything you care about, because 1) it's acid, and 2) it's a nasty permanent orange color. Even after it's neutralized, that orange color sticks around and will stain everything.

etched toggle, before Liver of Sulfur
6) Use Liver of Sulfur to oxidize the ring, to give a little contrast in the etched recesses. This is completely optional, but gives the piece nice depth.
7) Dome the copper toggle ring if desired.
8) Add a jumpring. Tumble the piece to harden it and bring out a gorgeous shine.

Sunday, July 15, 2012
Wire-wrapped Copper Heart Pendant
I'm going to dedicate a few posts to describing how I made the focal pendant and clasp I sent my partner, Kate, for this round of BSBP (Bead Soup Blog Party).
This is the copper wire pendant I sent Kate:
![]() It's freeform, in that I had no pattern to follow. I was basically flying by the seat of my pants, with just a rough idea of where I wanted to end up. But that's what makes it fun!
It's freeform, in that I had no pattern to follow. I was basically flying by the seat of my pants, with just a rough idea of where I wanted to end up. But that's what makes it fun!
I started by drawing an abstract paper heart, the size and shape I wanted the pendant to be, on some scrap paper. Then I cut out the paper heart.
Using a tape measure, I (roughly) measured the circumference of the heart I'd drawn, and added about an inch. I believe my measurement was about 6 inches, so I cut a piece of 14g dead soft square copper wire that length. If you don't have 14g, 12g is fine. And if you don't have dead soft, you'll probably have to anneal the wire before proceeding. (Which will lead to having to pickle the wire to remove the firescale - which is why I love dead soft!)
I knew that wherever I started forming the heart would also be where I ended, in other words, I needed to pick my starting point carefully because that's where I would end up doing some wire-wrapping to join the ends together. (I could have soldered them together, but this was a wire-wrapping project, not a soldering project!)
I chose the center top of the heart, figuring that adding some binding wires there would result in the best balance in the finished design. I started my design about 3/4" from the end of the wire, and laid the wire on top of my cut-out paper heart. Using my thumbs, I gently bent the wire to follow the various curves I had drawn, with the except of the 90 degree bend the heart takes at the bottom right - here, I used my flat nose pliers to put a 90 degree kink in the wire, before continuing to curve the wire along my paper template.
When I reached the beginning/end of the design, I left about another 3/4" of wire, and then cut off the excess.
It's important to point out that during this whole shape-forming process, you have to be very careful not to twist the square wire while you are bending it. You want the same surface of the square wire to face upward during the entire process.
Where the beginning and end of the wire met at the top of the heart, I crossed them over each other and then used just enough 24g round copper wire (also dead soft) to form a binding wrap that held the heart shape together. Then I used my round nose pliers to form a loop in both the free ends, bending them around to meet the inside border of the top of the heart, using care again not to twist the square wire. Then I wrapped around these loops and the outside frame of the heart again, until it was secure, and carefully tucked in the ends of the binding wire. No sharp edges!
Then I used a chasing hammer to texture the copper heart frame, resulting in this:
![]()
I could have added a bail or jumpring to this and called it a day, but I felt like it needed ... more. So I went searching for suitable embellishments, and chose turquoise blue matrix jasper.
I played with this a little on the paper heart template first. I had already decided against wrapping the jasper directly on the frame, encircling the heart with beads, because I really wanted to fill the wide-open center that was staring at me. I wanted to see how to best wire the jasper to the heart on paper before proceeding, because I didn't want to mar my pretty, shiny, textured copper heart. I really wanted an odd number of "strands" of jasper crossing the heart, because there is something so right about odd numbers in jewelry design. But 3 wasn't enough, and I couldn't make 5 fit. Until I hit upon the idea of having the 5th strand just cross one of the shoulders of the heart!
I used the 24g round copper wire again, securing it to one side of the heart, stringing on some jasper rounds, and then taking it across to the other side. I had a few false starts - one too many jaspers, one too few, attaching in the wrong spot - but I finally hit my rhythm, and got the 5 strands on there in a way that was very pleasing to me.
Next, I cut a 14g jump ring on the largest mandrel I had, and placed it in the top shoulder of the heart. It looked a little plain, so I wrapped it in more of the 24g round copper wire to give it a little texture. Then I put the whole piece in the tumbler for 2 hours to shine it and harden it, and here it is again:
![]() I like the texture that is mirrored by the wrapped jumpring, the joining wrap at the top of the heart, and the wraps that attach the jasper wires to the frame. Very unifying!
I like the texture that is mirrored by the wrapped jumpring, the joining wrap at the top of the heart, and the wraps that attach the jasper wires to the frame. Very unifying!
This is the copper wire pendant I sent Kate:

I started by drawing an abstract paper heart, the size and shape I wanted the pendant to be, on some scrap paper. Then I cut out the paper heart.
Using a tape measure, I (roughly) measured the circumference of the heart I'd drawn, and added about an inch. I believe my measurement was about 6 inches, so I cut a piece of 14g dead soft square copper wire that length. If you don't have 14g, 12g is fine. And if you don't have dead soft, you'll probably have to anneal the wire before proceeding. (Which will lead to having to pickle the wire to remove the firescale - which is why I love dead soft!)
I knew that wherever I started forming the heart would also be where I ended, in other words, I needed to pick my starting point carefully because that's where I would end up doing some wire-wrapping to join the ends together. (I could have soldered them together, but this was a wire-wrapping project, not a soldering project!)
I chose the center top of the heart, figuring that adding some binding wires there would result in the best balance in the finished design. I started my design about 3/4" from the end of the wire, and laid the wire on top of my cut-out paper heart. Using my thumbs, I gently bent the wire to follow the various curves I had drawn, with the except of the 90 degree bend the heart takes at the bottom right - here, I used my flat nose pliers to put a 90 degree kink in the wire, before continuing to curve the wire along my paper template.
When I reached the beginning/end of the design, I left about another 3/4" of wire, and then cut off the excess.
It's important to point out that during this whole shape-forming process, you have to be very careful not to twist the square wire while you are bending it. You want the same surface of the square wire to face upward during the entire process.
Where the beginning and end of the wire met at the top of the heart, I crossed them over each other and then used just enough 24g round copper wire (also dead soft) to form a binding wrap that held the heart shape together. Then I used my round nose pliers to form a loop in both the free ends, bending them around to meet the inside border of the top of the heart, using care again not to twist the square wire. Then I wrapped around these loops and the outside frame of the heart again, until it was secure, and carefully tucked in the ends of the binding wire. No sharp edges!
Then I used a chasing hammer to texture the copper heart frame, resulting in this:

I could have added a bail or jumpring to this and called it a day, but I felt like it needed ... more. So I went searching for suitable embellishments, and chose turquoise blue matrix jasper.
I played with this a little on the paper heart template first. I had already decided against wrapping the jasper directly on the frame, encircling the heart with beads, because I really wanted to fill the wide-open center that was staring at me. I wanted to see how to best wire the jasper to the heart on paper before proceeding, because I didn't want to mar my pretty, shiny, textured copper heart. I really wanted an odd number of "strands" of jasper crossing the heart, because there is something so right about odd numbers in jewelry design. But 3 wasn't enough, and I couldn't make 5 fit. Until I hit upon the idea of having the 5th strand just cross one of the shoulders of the heart!
I used the 24g round copper wire again, securing it to one side of the heart, stringing on some jasper rounds, and then taking it across to the other side. I had a few false starts - one too many jaspers, one too few, attaching in the wrong spot - but I finally hit my rhythm, and got the 5 strands on there in a way that was very pleasing to me.
Next, I cut a 14g jump ring on the largest mandrel I had, and placed it in the top shoulder of the heart. It looked a little plain, so I wrapped it in more of the 24g round copper wire to give it a little texture. Then I put the whole piece in the tumbler for 2 hours to shine it and harden it, and here it is again:
Saturday, July 14, 2012
Cobalt Spiral Bracelet
I had Venetian glass rounds that matched the beautiful cobalt blue and gold lentil bead in yesterday's necklace, so naturally I made a matching bracelet!
![]()

Friday, July 13, 2012
Cobalt Spiral with Venetian Glass Focal

I chose blue and gold lampwork beads for this spiral rope necklace, to accentuate the gold and deep cobalt blue in the gorgeous Venetian glass focal bead. Blues are SO hard to photograph - the blue in the focal is pretty true, but the blues in the spiral rope are photographing a little to sapphire-y, when they actually match the blue in the focal bead.
The basic beadwoven spiral is my go-to stitch - it works up quickly, and looks so radically different depending on the beads you choose. Love it!
Thursday, July 12, 2012
Bead Soup Treasures
A couple of weeks ago, I introduced you to my multitalented BSBP (Bead Soup Blog Party) partner, Kate Richbourg.
This week, I received a treasure trove of beads and findings from Kate - I am blown away by what she sent! She stuffed so much treasure in the box that I can't even fit it in one photo, so here are some shots of what Kate sent me.
 This box is just PART of what Kate sent - I love how Kate photographed everything in the box, and then turned the photo into a great label so I'd know what was what. That's the pic resting in the top of the box - it reminded me of those paper labels in the box of Whitman's Samplers, warning you of which chocolates contain nuts (I hate nuts!).
Here are some pics of some of the goodies in this box (I decided to just photograph representative beads instead of the entire stash, because there are just so many beads I could never photograph them all, and do them justice.)


chips (again), kyanite, Venetian glass, crystals, glass, howlite
But wait, there's more!

Such an amazing assortment! I really am overwhelmed - thanks so much, Kate!
Here is what I sent Kate - as you can see, I have a real problem figuring out how to photograph these soups to best show them off!
I like this photo, but you can't really tell what's in there:

Here is my second attempt:

I'm going to come back later this week and present tutorials on how I made the wire-wrapped copper pendant and the copper toggle.
Now I am in the market for a little inspiration, or fairy dust, or something. I have a few vague ideas for my BSBP treasures, but nothing's really jumping out at me right now. I'm glad I have a few more weeks until the reveal!
This week, I received a treasure trove of beads and findings from Kate - I am blown away by what she sent! She stuffed so much treasure in the box that I can't even fit it in one photo, so here are some shots of what Kate sent me.

Here are some pics of some of the goodies in this box (I decided to just photograph representative beads instead of the entire stash, because there are just so many beads I could never photograph them all, and do them justice.)

Sari ribbon

metal clasps - all beautiful, but I am fascinated by the wing!

metal charms

gemstone chips

crystals, vintage glass, Czech glass, gemstones, freshwater pearls

But wait, there's more!

copper wire solder, flat copper wire, 10g round copper wire, polish pads
Such an amazing assortment! I really am overwhelmed - thanks so much, Kate!
Here is what I sent Kate - as you can see, I have a real problem figuring out how to photograph these soups to best show them off!
I like this photo, but you can't really tell what's in there:

Here is my second attempt:

(l-r) black-gold amazonite, matrix jasper (left over from the pendant), chocolate freshwater pearls,
enameled metal beads and bead caps, wire-wrapped heart in copper and jasper, and copper toggle with enameled bar
I'm going to come back later this week and present tutorials on how I made the wire-wrapped copper pendant and the copper toggle.
Now I am in the market for a little inspiration, or fairy dust, or something. I have a few vague ideas for my BSBP treasures, but nothing's really jumping out at me right now. I'm glad I have a few more weeks until the reveal!
Wednesday, July 11, 2012
Wednesday Worktable
FIrst off, as I hope you know - the Iolite Fringe Necklace isn't on my worktable anymore, because I finished it! Yay!
Last weekend I started working on a pattern ("Slip Sliding Away") in the August/September 2012 issue of Beadwork. I work with herringbone a lot, and love it, but had never done twisted herringbone, so this was new to me.
This is the bracelet this morning:

I am working on the 2nd of 4 tubular twisted herringbone ropes that will comprise the bracelet. Nothing hard about it, but it is just slow going, lots of repetition (to the point that I'm bored now.)
Happy Wednesday!
Tuesday, July 10, 2012
Tangle Tuesday: AuraKnot 2
Another stab at Diva Challenge #78. (Here is my first try.)
Loving AuraKnot! As much as I love all the semi-straight "parallel" lines - which is why I love Betweed, and Paradox - I wanted to see how the pattern would do with curves:
![]() I like it! The petals of the AuraFlower look like onions to me.
I like it! The petals of the AuraFlower look like onions to me.
I got a little lazy witht he rest of the tile - sorry. It was time to leave for work!
Loving AuraKnot! As much as I love all the semi-straight "parallel" lines - which is why I love Betweed, and Paradox - I wanted to see how the pattern would do with curves:

I got a little lazy witht he rest of the tile - sorry. It was time to leave for work!
Tangle Tuesday: AuraKnot 1
This week's Diva Challenge is dedicated to AuraKnot, a new tangle that really appeals to the geometry nerd in me.
Here is my first attempt:
![]() I've noticed that I have a real problem keeping the lines even - my hands aren't shaking (not perceptibly, anyway) - but no matter whether I go very slowly, or very fast, or somewhere in between, I'll have a nice even line spacing going, and suddenly the line takes a big veer either away from the line I'm "aura-ing" or toward it, running smack into it. Anyone have any ideas on avoiding this - it drives me crazy, and that is not very zen.
I've noticed that I have a real problem keeping the lines even - my hands aren't shaking (not perceptibly, anyway) - but no matter whether I go very slowly, or very fast, or somewhere in between, I'll have a nice even line spacing going, and suddenly the line takes a big veer either away from the line I'm "aura-ing" or toward it, running smack into it. Anyone have any ideas on avoiding this - it drives me crazy, and that is not very zen.
I wanted to put the AuraKnot on a background of other tangles, and I'm pretty happy with what I created.
I want to thank the Tangle community who have been so welcoming to me - this is tons of fun! And apologies to the member who left me a lovely comment last week, and my fat fingers on my stoopid iPad accidentally hit the "delete" button instead of the "publish" button, and the nice comment disappeared forever into the ether. Sorry!
Here is my first attempt:

I wanted to put the AuraKnot on a background of other tangles, and I'm pretty happy with what I created.
I want to thank the Tangle community who have been so welcoming to me - this is tons of fun! And apologies to the member who left me a lovely comment last week, and my fat fingers on my stoopid iPad accidentally hit the "delete" button instead of the "publish" button, and the nice comment disappeared forever into the ether. Sorry!
Subscribe to:
Posts (Atom)


