Showing posts with label leaf. Show all posts

Sunday, August 14, 2011

Flight of the Dragonfly

I switched things up a little; I actually started AND finished a jewelry design without letting myself get distracted by other projects.

This is "Flight of the Dragonfly."

Its working title was "Kitchen Sink", because I started off by laying out on my workbench all the various components I wanted to incorporate: beautiful etched lampwork beads, some green fire agate, the porcelain dragonfly component, brown freshwater pearls, Czech glass accents, some bronze metal disc beads, Swarovski crystals, and lots of Vintaj Natural Brass components, including chain, wire, leaves, dragonflies (or butterflies - I can't tell), bead caps, and rings. Everything but the kitchen sink, it seemed!

By the time I had gathered everything and carefully laid it out, I couldn't see my work surface anymore, and had to shove everything a lot closer together in order to have about 8 square inches to work!

There is so much going on in this necklace, and I just love how it turned out!


2 very different elements converged to inspire this piece.

One was this beautiful porcelain Dragonfly focal connector. I had bought it several weeks ago, and it was actually for sale in the shop (my B&M bead shop), but I guess it was burned into my subconscious.


I told you a couple of weeks ago about my foray into alcohol inks.

I have played around with a lot of colors, and designs, and different spins on the technique, and we actually dedicated an entire studio day to seeing how many different ways we could use alcohol inks, embossing powder, and paints on various metals.

Shortly after that studio day, I walked past the display where the dragonfly focal was, and picked it up, and started grabbing various leaf and dragonfly Vintaj pieces, and began playing with the techniques to color my metal components. I didn't want them all to look the same, so there are actually 4 different coloration techniques demonstrated here.


And it never occurred to me that it would take a mighty big necklace to work all these components together!

I just started walking around the shop with the porcelain dragonfly and my colored metal components, and began grabbing things here and there that went together, and soon I had an awful lot of stuff to put together!


It didn't take long for me to realize that I needed a matching jumprings, in several different sizes, in order to make this all work, so I wound coils of Vintaj Natural Brass wire, in 5 different sizes, and 2 different gauges, and then cut and tumbled them.


This picture shows what I called "phase I." It has the porcelain dragonfly focal, one of the lampwork beads, and a few of the colored Vintaj components. There is a Vintaj ring (to the left of the focal in this pic) that I embellished with a picot stitch. Everything is connected with chain, jumprings, and some artful wire-wrapping that serves both as a structural component and a design element.

The porcelain dragonfly focal bead had 3 holes, and I love the chain tassel I created (with the little dragonfly flitting by!)


It was at this point that I realized this was going to be more than a one strand necklace. I had only used a few of the specially-colored Vintaj elements that I specifically created for this piece. And only one of the lampwork beads! And none of the unusual green fire agate. And by gosh, I was going to use everything I had picked out!!

After all, my motto is More is More! I am the queen of embellishing!


And all this time realizing that my components and wire-wrapping couldn't extend up around my neck, or I wouldn't be able to wear my own design.


Here is "Phase II."

I have added another of the lampwork beads, and another of my green Vintaj leaves. And in order to balance the second strand, I worked in some more of my luscious bronze metal discs, and needed a 3rd focal element for the other side of the second strand, so I got up and searched for yet another element to add to this necklace! I found an abalone donut with the perfect colors, so I borrowed a page from Denise Peck's brand new book on Wire Findings, and used Vintaj Wire to wrap the abalone donut and incorporated it into the second strand.
I still had components I wanted to add, and I wanted to soften all the wire and metal elements, and in my mind I saw a 3rd strand, softly nestled between the 2 strands here, consisting of off-white freshwater pearls, small teal seed beads, and delicate Vintaj Natural Brass chain, all twisted together.

And I couldn't do any more embellishing to the top strand until I had that middle strand in place.

This might have been the point where I realized I had lost my mind, or should have stepped back for a reality check. Danger, Will Robinson!!

I strung the seed beads, one at a time.

I strung the off-white button pearls, one at a time.

I sat there, twisting them with the Vintaj chain, trying to figure out how to attach this torsade element without using another bulky component (e.g. a cone), but none of the beadcaps I had were large enough to cover the crimps. So I ultimately ran the pin holding the crimped seed beads, pearls, and the chain up through a cone, and attached it to one side of the necklace. And the 3 strands hung there on the bust (the seed bead strand and the pearl strand clamped of with Bead Stoppers) while I tried to figure out how to calculate the correct length, twisted, to get this strand into position. I didn't want to be stringing and restringing, crimping and recrimping, and repeatedly re-wrapping the headpin on the other side. I just wanted to do this once!

And then it sat there on my workbench for 2 full days while I played with it, held it up, tried it on, and procrastinated. I was so determined to attach this middle strand just once. (LOL)

I knew I just needed to go for it - make my best calculated guess at the length, and if it was wrong, it was wrong. I pulled the crimps through the wrapped loop on the other headpin, and hung the chain on the pin; ran the headpin through the cone; tried it on while holding the headpin/cone in position, and it looked great.
So I crimped everything, wrapped the loop, and tried it on, crossing my fingers. Because I really didn't want to do this part over.

Too bad I forgot to calculate for the length of my wrapped loop where the 2nd cone attached to the necklace. Because sure enough, the twisted 3rd strand was exactly 2mm too long. Just the length of my wrapped loop! The middle strand just didn't hang exactly in the middle between strands one and three. While it wasn't touching the 3rd strand, it was hanging just low enough to bug me. And if Momma ain't happy, she won't be wearing the necklace.

I pouted for about 15 minutes, and then cut the offending wrapped loop.

I tried to salvage my stringing efforts by carefully cutting the crimps, hoping to avoid having to restring the pearls and seed beads. HA! I spent an hour trying to avoid the restring, and ultimately couldn't get the crimps off. I actually shredded the beading wire trying to remove the crimps. So I started all over, and got it right the 2nd time. Yay!

I began embellishing again, hanging dangles here and there. I managed to include all my desired elements and while it looks a little crowded on the bust, remember that it hangs differently on any real person, as the bust's neck measures only about 12 inches. So when worn, the 3 strands and all the various elements spread out nicely and evenly.


Ta Da!

Sunday, January 30, 2011

Evolution of a design

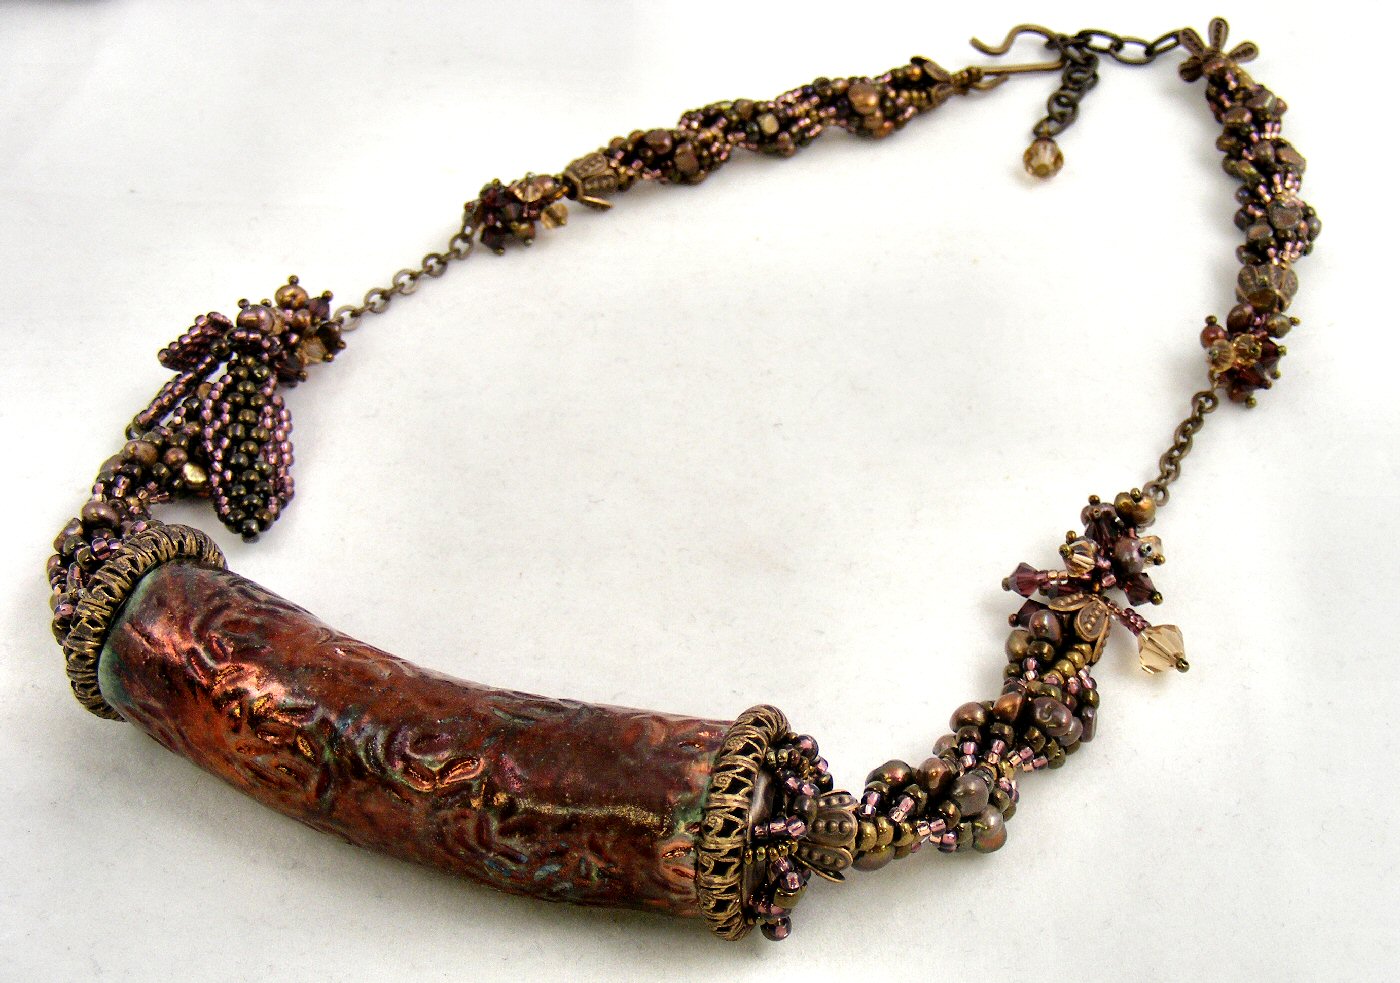
I had this gorgeous, large, burgundy Raku bead, and my original plan was to braid a simple beaded kumihimo rope to suspend it from.

But this design quickly became a study in problem solving, with problem #1 being that I didn't have any matching seed beads in a size that would work up into a beaded kumihimo rope.

So I decided I would fall back on one of my favorite beadweaving stitches, the spiral.

I had too many bead choices here, and had to play with them, and keep narrowing them down, so that I didn't end up with a overly busy or chunky spiral rope that would overwhelm the bead, despite the bead's size.

Because this raku cylinder bead was huge - almost 4 inches long, with a very large hole running through it.


This is the spiral I finally decided on: brown freshwater pearls, mauve seed beads, burgundy seed beads, olive green seed beads, and copper seed beads for the core. After stitching this 2 inch length, I came upon problem #2: how to cap the large raku bead?

I spent a couple of days working on this beadcap issue. I stitched a number of different attempts from seedbeads, in various sizes, and various patterns, but none of them worked; they needed to be relatively flat on the end, and then immediately flare out pretty widely, and then hug the bead.

And no ready-made beadcaps were anywhere near the size of this bead's end, so I kept stewing, and started looking around for anything I could use to cobble together a suitable beadcap.


I finally found a combination of Vintaj brass findings that I felt, theoretically anyway, could work.  I used metal punch pliers to punch 6 holes in a Vintaj brass ring, to correspond with the placement of the 6 petals on the Vintaj flower.


These are the 3 Vintaj components I finally settled on - the larger ring is a good size for the end of the Raku bead.


Here is how the 3 components stacked in my plan -  now I just had to get them to stay fastened together (and attach them to the bead!)

I made a number of attempts to wire-wrap the components together, but wasn't happy with any of the results.


So I decided to weave the components together with seed beads, and after several more tries, this is the (somewhat over-exposed, sorry) result. 

I then used 20g Vintaj brass wire to wire the caps to the bead, and then attached a length of spiral to each end.  The original plan, after settling on the spiral, was to have the whole necklace be a simple spiral, but by now I had so mych time and energy invested that I decided to glam it up, and added a short length of Vintage brass chain with fringe embeliishment comprised of Swarovski crystals and freshwater pearls to each side, before continuing on with the spiral rope.


Of course, I had to do some more embellishing, so I added fringe to one side, and some freeform peyote leaves to the other.


Then I finished with a Vintaj brass S-hook and extender chain, providing an adjustable finished length.


Sunday, May 4, 2008

I'm Going to School!

I need to clean up a few odds and ends here.

A few posts ago, I talked about the Silver Paste Class I took. You also may recall that my fabulous camera has pooped out on me, and is somewhere being fixed, I hope. So I took my handy, back-up, tourist, not-for-professional-photography-purposes camera with me to class, and snapped a few shots, and here we go!

The first step was painting several very thin coats of the silver paste onto the leaf. This photo was taken after 2 coats, before my gingko leaf started to reject the paste!


After all the paste is applied, the leaves were fired in the kiln. It is hot enough, and retains heat well enough, during this short firing period that the lid can stay off during firing.

You know I love to take the picture of the exact time the organic binder burns off! All the other students' projects are shown, too. Theirs are almost done, because they didn't have problems getting the paste to stick to their leaves, and they didn't have to keep starting over!

My finished gingko leaf looked a little plain, so I added an off-set garnet, and refired it. Also shown is my back-up geranium leaf, which broke during firing because I used so much paste on my gingko that I didn't have enough to adequately coat the geranium.

Most people can't tell the geranium leaf is broken 'til I point it out, but it is - there on the upper right, the leaf should curl up to meet the nicely curling fan on the upper left.

Meh.


And now a little business. Sales are booming over in my Etsy shop. (Yay!) I have several new things I'd love to list, but I can't, unfortunately, because I have no way to photograph them until I get my camera back. So I will keep relisting for awhile.

Meanwhile, I leave this Sunday for 2 weeks at William Holland Lapidary School. I love going to William Holland! There are so many friendly, talented people there, and I always come home renewed, refreshed, and full of new ideas, not to mention brimming with freshly learned techniques. I have never gone for 2 weeks in a row before (I attended for 4 weeks last year, but they were spread out), but with the price of gas, and the long drive, I decided to do it this way this year. My only regret about this arrangement is that Bailey will be at the "doggie hotel" for the whole 2 weeks (Ssshh - he'll hear us!)

I had originally planned to close my shop while I was gone, but have decided to leave it open, with an announcement that all shipping will be delayed until my return on May 26. I'll have internet access while I am there, and can check my shop, and my convos, so I will be able to stay on top of stuff.