Showing posts with label chain. Show all posts

Sunday, August 5, 2012

Blue and Silver Chainmaille Bracelet

I love weaving jumprings together - wish I had more time for it!

This bracelet is made with blue artistic wire rings and sterling silver:
The basic unit has a box shape:


This bracelet has such a wonderful drape when worn!


Sunday, June 17, 2012

Chainmaille Earrings with Swarovski Crystals

Chainmaille is near and dear to my heart, in all its iterations - but with my well-known love of embellishing, this pair of earrings was a natural:

They began as "flat chain", a weave I really love - it looks especially nice in bracelets, because it lies so flat. Hmmm -- wonder if that's where the name came from? LOL. This particular flat weave was done with 14g square rings (meaning, the round jump rings were created from 14g square wire). Many of you know I love to mix up my chainmaille by using heavier gauges and/or square or twisted wire for the rings, like this JPL, this dragonscale, and this tryzantine.

Anyway, since this weave does like to lie flat, it was an unusual choice for earrings. But I wanted the earrings, to go with the matching bracelet (which doesn't have crystals - yet). Once I had woven the rings into the earring length I wanted, I saw that they just didn't want to hang right, so I started thinking about dangles. I love Swarovski crystals in Fire Opal AB, and like how they look when paired with citrine AB Swarovskis - so bright, vivid, and summery! So that's what I chose, and I love these earrings!

I haven't listed the bracelet on Etsy - I'm debating with myself over whether to put the fire opal and citrine crystals on the bracelet. But the earrings are available! And if you like them, and would like a matching bracelet (with or without crystals) feel free to contact me through my Etsy shop!

Tuesday, April 3, 2012

Chainmaille Lariat

This heavy sterling silver lariat is woven with 16g rings in a tubular variation of the European 4-in-1 chainmaille weave, and feels so good to wear - it drapes so gracefully! I used snowflake obsidian and gorgeous tourmalinated quartz for the dangles - I wanted to use just these beautiful pieces of tourmalinated quartz, but I didn't have enough! Don't you hate when that happens? But the snowflake obsidian fills in nicely, I think.

Sunday, March 11, 2012

Dragonscale Variations

Dragonscale is my favorite chainmaille weave. It is a dense, complex weave, and can be challenging. Dragonscale calls for 2 different sizes of jumpring, with the smaller one being required to nestle entirely within the larger one. The many colors and combinations of jump rings available allows for seemingly endless combinations to this fascinating and interesting pattern.

This was my first Dragonscale:

I had seen quite a few pics of dragonscale bracelets in various magazines, including an ad by Beadalon that ran for months in many of the beading magazine, and featured a pink and silver dragonscale bracelet. I was determined to teach myself this weave, and chose a complex palette designed to mimic the oceany colors in a coral reef (I used to scuba dive a lot, back when I had a real job, and wasn't a starving artist!) I finished this bracelet about a year and a half ago, and it remains one of my favorite creations. It's made with all 18g rings, and is soft, flexible, and slinky. The colors I chose make it hard to see that one ring is smaller, and sits inside its larger counterpart.

About a year later, I found time to get back to dragonscale, this time mixing 16g sterling silver rings and 16g square copper rings (the wire used for the rings was square). It is easier to tell from this 2-color combination that the smaller, copper ring is nestled inside the larger, sterling silver ring.


This bracelet was extra challenging because it took more hand strength to close the 16g rings. The bracelet is also denser, and much less flexible, because the AR (aspect ratio) has been markedly decreased by the larger gauge wire AND the fact that half the rings are square.

It is really easy to see from this picture why this weave is called Dragonscale - don't the overlapping silver rings remind you of scales on a reptile's skin?

I finished my third dragonscale variation earlier this week:

This one uses all 20g rings, and the slinky flexibility I love about dragonscale is back! I think you can see that the smaller, blue ring sits inside the larger, sterling silver ring. If you are planning to learn dragonscale, take my advice and choose 2 contrasting colors for your first attempt, so that you can easily see which ring goes where!

I wanted to show you some photos I took of the 3 bracelets, trying to demonstrate this flexibility I keep mentioning, as well as some other fun facts about working with different gauges of wire in chainmaille.

Here are my 3 dragonscale bracelets together:

The bottom bracelet (the blue and green 18g dragonscale) is 7 rings wide.
The copper and silver 16g bracelet is 5 rings wide.
The blue and silver 20 g bracelet is 5 rings wide.

Note the marked difference in width between the copper/silver bracelet and the blue/silver bracelet, even though they are the same number of rings wide: this difference is because the 20g jump rings are so much smaller than the 16g ones.

Here is another series of photos, showing the 3 bracelets fully extended, and then fully compressed, to show how much flexibility is inherent in this pattern:


Fully extended, this bracelet (excluding the clasp) is nearly 6.5 inches long.

Compressed, it is only 3 inches long, meaning over half the length of the bracelet can be swallowed up by the open nature of this intricate weave!


Fully extended, this 20g dragonscale bracelet (excluding the clasp) is 7 inches long.

When compressed, this dragonscale bracelet is only 5-3/4 inches long.


When extended, this dragonscale bracelet is 8 inches long.

Compressed, this dragonscale only loses about 1-1/4 inches of length. This loss of flexibility is primarily due to the square wire used for the copper rings, although the heavier gauge wire is also playing a role. In order to achieve the flexibility I have in the other 2 bracelets, I would have had to make both the sterling and the copper rings in this bracelet much, much larger.
As you can probably imagine, this dense 16 gauge dragonscale bracelet is also quite heavy, and because of the dense nature of the weave, it retains a rounded cuff-like shape when worn, which I actually think is pretty cool. It definitely makes a statement!
That's probably way more than you ever wanted to know about dragonscale, and chainmaille in general. Sorry - I tend to geek out a little bit about it!

Tuesday, March 6, 2012

Hot off the Worktable

Just finished - a Dragonscale bracelet with 20g rings:
The rings are royal blue enameled copper and sterling silver.

Dragonscale is one of my favorite weaves, and I am going to dedicate a post to it later this week!

Sunday, January 30, 2011

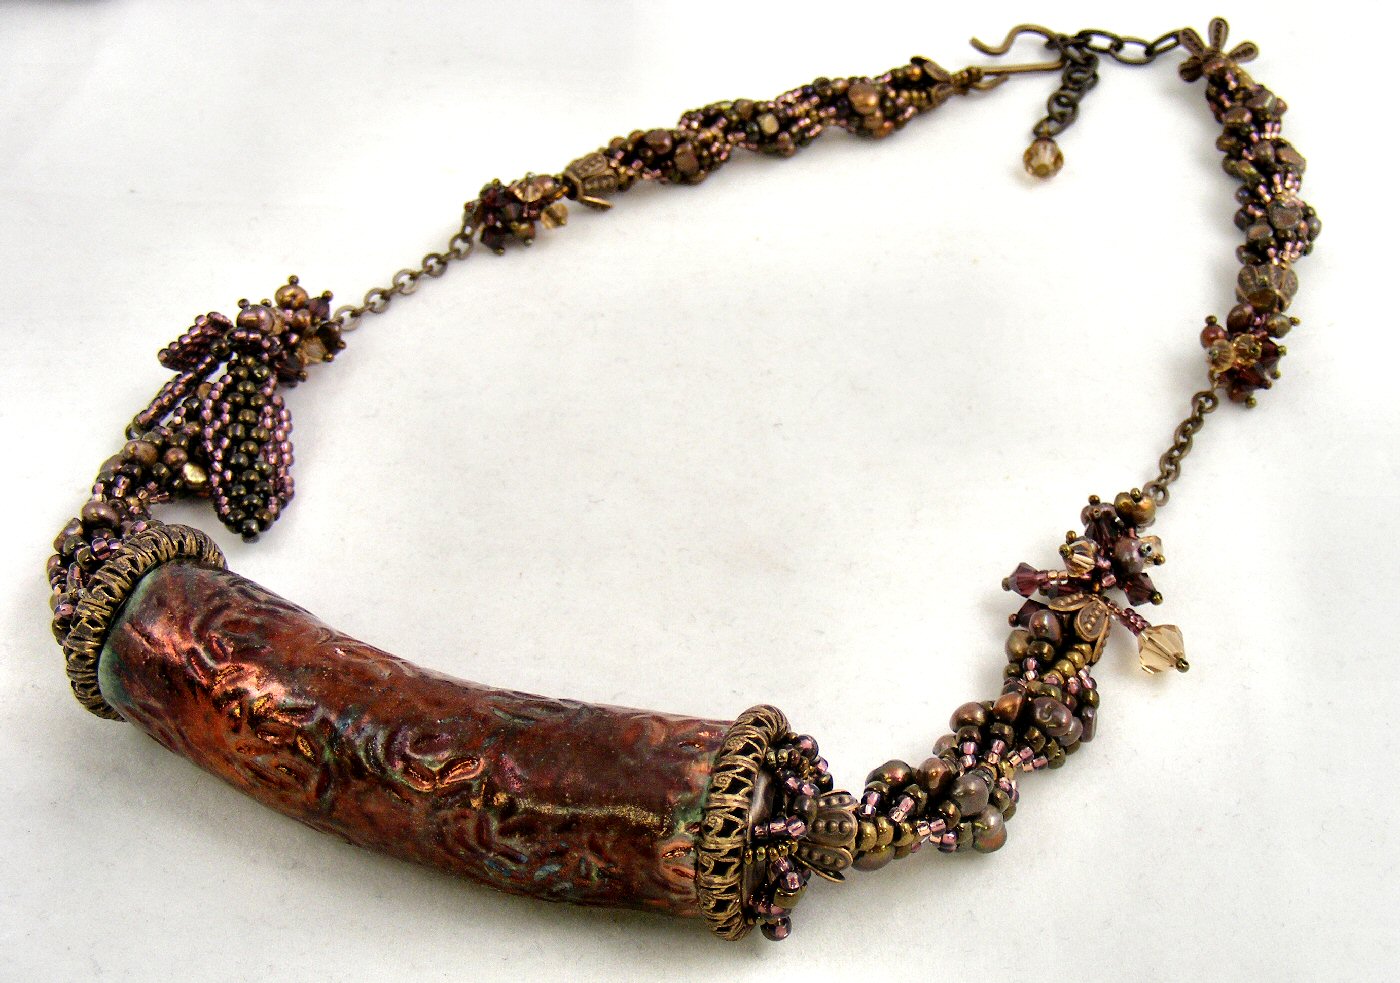
Evolution of a design

I had this gorgeous, large, burgundy Raku bead, and my original plan was to braid a simple beaded kumihimo rope to suspend it from.

But this design quickly became a study in problem solving, with problem #1 being that I didn't have any matching seed beads in a size that would work up into a beaded kumihimo rope.

So I decided I would fall back on one of my favorite beadweaving stitches, the spiral.

I had too many bead choices here, and had to play with them, and keep narrowing them down, so that I didn't end up with a overly busy or chunky spiral rope that would overwhelm the bead, despite the bead's size.

Because this raku cylinder bead was huge - almost 4 inches long, with a very large hole running through it.


This is the spiral I finally decided on: brown freshwater pearls, mauve seed beads, burgundy seed beads, olive green seed beads, and copper seed beads for the core. After stitching this 2 inch length, I came upon problem #2: how to cap the large raku bead?

I spent a couple of days working on this beadcap issue. I stitched a number of different attempts from seedbeads, in various sizes, and various patterns, but none of them worked; they needed to be relatively flat on the end, and then immediately flare out pretty widely, and then hug the bead.

And no ready-made beadcaps were anywhere near the size of this bead's end, so I kept stewing, and started looking around for anything I could use to cobble together a suitable beadcap.


I finally found a combination of Vintaj brass findings that I felt, theoretically anyway, could work.  I used metal punch pliers to punch 6 holes in a Vintaj brass ring, to correspond with the placement of the 6 petals on the Vintaj flower.


These are the 3 Vintaj components I finally settled on - the larger ring is a good size for the end of the Raku bead.


Here is how the 3 components stacked in my plan -  now I just had to get them to stay fastened together (and attach them to the bead!)

I made a number of attempts to wire-wrap the components together, but wasn't happy with any of the results.


So I decided to weave the components together with seed beads, and after several more tries, this is the (somewhat over-exposed, sorry) result. 

I then used 20g Vintaj brass wire to wire the caps to the bead, and then attached a length of spiral to each end.  The original plan, after settling on the spiral, was to have the whole necklace be a simple spiral, but by now I had so mych time and energy invested that I decided to glam it up, and added a short length of Vintage brass chain with fringe embeliishment comprised of Swarovski crystals and freshwater pearls to each side, before continuing on with the spiral rope.


Of course, I had to do some more embellishing, so I added fringe to one side, and some freeform peyote leaves to the other.


Then I finished with a Vintaj brass S-hook and extender chain, providing an adjustable finished length.


Tuesday, January 4, 2011

Very Sparkly Spiral Chainmaille Bracelet and Earrings

The spiral chainmaille rope is another of my favorite weaves. This set is woven with sterling silver half-round rings, so it is lighter in weight than you would expect, and the spiral weave allows the bracelet and earrings to catch the light with every movement. I just love this set!


The textured toggle reflects the spiral pattern in the bracelet, which is now available in my Etsy shop.

The matching earrings are also available in my shop!

And by the end of this week, I will have this bead embroidery cuff bracelet finished - or at least, that is the plan....lol.

Monday, November 22, 2010

Jen's Pind Linkage (JPL)

JPL (Jen's Pind Linkage) is one of my favorite chainmaille weaves. It yields such a nice, tight, spiral weave, and in my opinion works well whether done in one color, multiple colors, round rings, square (wire) rings, and more.

In this photo, you can see 3 very different JPLs I have done:


The top chain was made with 16g gold-filled (round) rings, the middle one with 18g bronze rings cut from square wire, and the bottom one is a tricolor chain in 20g rings (copper, gold-filled, and sterling),

This is another photo of the 20g tricolor JPL:


I enjoy working with color so much that I made another 20g tricolor JPL to compliment the chain-bezelled raku cabochon now available in my Etsy shop.


I chose turquoise, blue, and burgundy rings for this chain; they pull out the gorgeous colors in the raku cab.

Here's a guided tour of the creation of the 18g bronze square JPL:

Getting started: big pile of rings, and a clasp.

The weave is established, and now I just have to keep it going until I reach the finished length:


Halfway done!


Finished:


Detail of finished weave:


I believe this square version of the JPL would make a great bracelet for a man - particularly if stepped up to 16g square rings.

Saturday, October 16, 2010

You know you are a bad, bad blogger when...

... it has been so long since your last post that you no longer remember your password. Geez.

But anyway....

I have been busy, busy; I have been on a real creative spurt since my last, and jumping from medium to medium, occasionally combining media, and have started a number of different projects, and actually finished all but 2 of them! So here's a run down of what's been going on:


I have been playing around with different color combinations, as well as different metals, in this variation of the Byzantine chainmaille weave:


This pattern is fun, easy, and so versatile, and was attracting a lot of attention in the shop, so I actually put it on the class schedule, and taught it for the first time today. I spent almost all day coiling, cutting, and tumbling rings on Thursday - I figure I cut over 2000 rings! We had a good turn out for the class, and the students chose some beautiful color combos, and everyone had a great time.


Beadweaving is one of my first loves, and it had been over a year since I did any beadweaving (other than teaching, so I was so excited to get this project started. I had all the beads picked out, and all last weekend to play with them, so I started by sketching out a crude road map, and began by stitching the clasp: I added a row of picot to the Vintaj brass ring, and stitched the bar in peyote.


I was basically designing the whole necklace around those juicy 8mm top-drilled topaz Swarovski crystals - I turned them into a ripe cluster at the front of the necklace, and then used the spiral stitch and some Vintaj chain to finish the piece. Lots of fun! Nice earthy Fall colors, too. And it's available in my Etsy shop!

But I wasn't done yet - I still had time last weekend to make this chainmaille necklace and bracelet, in navy blue and sterling silver. I love this particular weave!


I was able to snatch up this gorgeous cabochon from MAKUstudio, and while there are a lot of ways to turn a cabochon into jewelry, I really wanted to make a chainmaille bezel for this one, so I pulled the copper, burgundy, and blues from the cab with the rings,
but decided the end result was too "hard" looking, so I decided to soften it by weaving seafoam green eyelash yarn into the chainmaille, and I just love the organic look that resulted. I finished the necklace with a small, tricolored Jen's Pind Linkage chain, again pulling the colors from the cab.


Check out MAKUstudio's shop - you won't be sorry! She is a tremendously talented lady!


I had enough rings left over from the chain to make this pair of shoulder-dusting dangle earrings - and the necklace and earrings are available (separately) in my Etsy shop, too!


I was determined to teach myself the dragonscale chainmaille weave, and found several free tutorials online, and also had a pattern from an old magazine - Step-by-Step Wire, maybe - not sure. But between the 3 sets of instructions I had, I figured I was good to go.

The instructions recommended making the bracelet in 2 colors, one for the small rings, and one for the large rings, so that you could more easily see what goes where - but I didn't WANT a 2-color dragonscale bracelet; I wanted a multicolor one in blues, greens, pinks, and purple, so I spent hours figuring out how many rings of each size and color I would need, spent half a day coiling and cutting them, and got down to business.


It took several hours to get the hang of the pattern, but I finally got going, and then it just took several days to weave it up - there are a LOT of rings in this bracelet!

Love the result, and it is definitely a keeper!

And while all this was going on, I received a custom order: the lady wanted 10 pink bracelets for her coworkers, and she wanted all of them to be different, and while they were for breast cancer awareness, she didn't want any pink ribbon stuff -


So these were the 10 complete bracelets, and she was delighted, and wants to get more.

I also started 2 other projects - a  beadwoven lariat, and a purple kumihimo lariat (I am on a real lariat kick lately). These are both more than halfway done, and my plan is to finish them this weekend (MY weekend is Sunday and Monday) and then get started on a bracelet pattern I purchased from SandFibers. I want to be able to get the pattern stitched up, and then start teaching it at my shop as soon as possible. So I see a busy 2 days in my future!

But tonight is "sit with your feet kicked up" night, which is actually pretty hard for me - I like to be doing something with my hands, but this week has kicked my butt! But as you can see, I am not doing a very good job of not doing anything, because here I sit blogging - so I am done now, and am going to watch a little TV.

PS - Gumball and I popped into the vet's office to check on his weight, and he has gained 1.5 pounds! He now weighs 12 lbs, and only has to gain 2 more pounds to no longer be considered underweight. But 2 lbs is a lot, when you only weight 12 lbs - that's almost 20% of his current bodyweight, right?
This is my little sweetie right now - lying on Bailey's big bed, which he has claimed as his own, snoring after snarfing down his dinner!