
A body at rest tends to stay at rest; a body in motion tends to stay in motion.
This is a common paraphrasing of Newton's First Law of Motion, which actually states: "The velocity of a body remains constant unless the body is acted upon by an external force."
Who knew that physics could so easily explain why I would rather lie under my warm covers, reading, than clean house? And to think Physics was my least favorite subject (PE ran a close second...)
Monday, January 2, 2012


Sunday, January 1, 2012
Happy New Year!
Happy New Year!
I am going to try to post something here everyday (I know, you are on the edge of your seat!)
Maybe just a simple picture, or a book recommendation, or the story behind one of my designs; no promises, but I am going to try.
Blogger is a user-unfriendly platform, especially if the user is on an iPad (where Blogger will not allow spell-checking, or the embedding of pics), so I have been lax about blogging. And much like my jewelry photo-taking, the more I put it off, the more it piles up, and so when I would finally sit down to blog, the shear volume of information I wanted to share was overwhelming. Few people want to read all that stuff, and I didn't want to plod through the posting, so I trying a new approach. Snippets here and there.
Hope you have a wonderful 2012!
[A photo-less post from my iPad]
I am going to try to post something here everyday (I know, you are on the edge of your seat!)
Maybe just a simple picture, or a book recommendation, or the story behind one of my designs; no promises, but I am going to try.
Blogger is a user-unfriendly platform, especially if the user is on an iPad (where Blogger will not allow spell-checking, or the embedding of pics), so I have been lax about blogging. And much like my jewelry photo-taking, the more I put it off, the more it piles up, and so when I would finally sit down to blog, the shear volume of information I wanted to share was overwhelming. Few people want to read all that stuff, and I didn't want to plod through the posting, so I trying a new approach. Snippets here and there.
Hope you have a wonderful 2012!
[A photo-less post from my iPad]
Wednesday, December 28, 2011
Kvetching about Projects
Not MY projects, mind you. Although it's a little tempting - - so little time, so much to do. My completed designs continue to pile up in my photo tent, where I carefully place them upon completion, with great intentions. But alas, the Photo Fairy never arrives, and I just know that if SHE is a no-show, then her friends, the Download Fairy, the Editing Fairy, the Uploading Fairy, and that fickle bitch, the Listing Fairy, will also be no-shows. And the more projects I pile up, the less I feel like tackling that job!
So, while I have been creating, I have no actual proof for you.
But on with my current peeve!
Like I said, Projects. Project Accessory, and Project Runway AllStars, to be exact.
First, Project Accessory.
Hard to know where to start, so let's just dive in.
I realize Project Accessory is a spinoff of Project Runway, but the producers really would have been wise to distance themselves a bit, stylistically, from PR. They have used PR's sets, identically (except for changing the logos from Project Runway to Project Accessory). They use the same format as PR, which could have worked, if only the show weren't so tragically flawed.
Molly Sims? Vapid. Certainly no style icon. Boring. Strutted some ridiculous looks on the runway in her little segments. She is no Heidi Klum.
Eva Longoria Manicotti, or whoever she is? Awful. Mentor? Unh-uh. Found her commentary pointless, and was it just me, or did it sound like she was really just saying different versions of the same thing everytime? She's no Tim Gunn.
The judges? Boring. At least Michael Kors and Nina Garcia show some humor and personality. Kenneth Cole? Ariel Foxman (who?)...Zzzzzzzzzz

So, while I have been creating, I have no actual proof for you.
But on with my current peeve!
Like I said, Projects. Project Accessory, and Project Runway AllStars, to be exact.
First, Project Accessory.
Hard to know where to start, so let's just dive in.
I realize Project Accessory is a spinoff of Project Runway, but the producers really would have been wise to distance themselves a bit, stylistically, from PR. They have used PR's sets, identically (except for changing the logos from Project Runway to Project Accessory). They use the same format as PR, which could have worked, if only the show weren't so tragically flawed.
Molly Sims? Vapid. Certainly no style icon. Boring. Strutted some ridiculous looks on the runway in her little segments. She is no Heidi Klum.
Eva Longoria Manicotti, or whoever she is? Awful. Mentor? Unh-uh. Found her commentary pointless, and was it just me, or did it sound like she was really just saying different versions of the same thing everytime? She's no Tim Gunn.
The judges? Boring. At least Michael Kors and Nina Garcia show some humor and personality. Kenneth Cole? Ariel Foxman (who?)...Zzzzzzzzzz

(Eva, Kenneth, Ariel, Molly)


And the concept? I just don't get it. I design jewelry. That's what I do. Would anyone really expect me to be able to design and fabricate a pair of shoes? This conceptual disconnect really bugged me from episode one. James was a fantastic shoe designer, but didn't stand a chance in a jewelry designing challenge. Etc.
And the finale? WTF?
As the final 3 were picking partners for the last challenge, I actually predicted, out loud, that whomever chose James would win, because they would have shoes in the bag (sorry). Yet, the first 2 contestants ignored James, and Brian nabbed him.
And Brian won - this is my big WTF moment. First of all, that resin necklace he created (below, far right model) looked like chipped, cracked golfballs and driveway gravel on gold-plated chain. Hideous. As was that weird necklace he actually sported himself at the runway show. Weird.

But the boots (center model), the pumps, and the clutch? Fabulous. Especially those slouch boots! I covet them. But, here's ths thing. Brian may have chosen that beautiful leather at Mood, but he didn't design OR fabricate the footwear, and my gut feeling is he had little to do with the clutch, either. So he wins, but because of James' contributions. In other words, James won.
And who should have won? Rich Sandomeno. Truly a genius with jewelry design and fabrication. So innovative. And that clutch he designed with the textured copper was incredible, and another piece I covet! But unfortunately, Rich was saddled with Diego for the final challenge. A mismatch if every there were one, stylistically, talent-wise, and especially in terms of attitude.
So, Project Accessory? A complete head-to-toe makeover is in order, and there might be hope for a second season. Make it work!
So, moving on the Project Runway Allstars.
I am a huge Project Runway fan, so I was more than excited to discover that the Allstar edition premiers in a week or so. I have seen the ads on LifeTime for a few weeks, but the only face I recognized was Austin Scarlett (I blame the rapid-fire editing of the commercial), so I cruised over to the website to see who these allstars would be. Well, ... uh, OK. As with most Allstar castings, I have mixed feelings. Love some, love to hate others (Hi, Kenley!)! And wonder about the inclusions of the rest (Rami? Zzzzzz). And am really sorry that Chris March isn't there! Did you guys SEE Mad Fashion? Love! Except the part where Bravo decided not to air the finale multiple times, like they normally do, so my DVR was set to record it, yet Bravo plugged in some sucky replacement show, so no mad Fashion finale for me. But I digress...
Here's the kicker. The REAL allstars of Project Runway are Heidi, Tim, and Michel Kors. Not so much Nina Garcia, but the other 3 are mandatory. So imagine my horror to see Joanna Coles cast in the Tim Gunn mentoring role (if you haven't seen her as a guest on PR, she is dry and dull), Angela Lindvall (Who??) in the Heidi spot, and Isaac Mizrahi (tool!) as a judge. Of course, that last bit explains why Tim Gunn is having no part in this. But Project Runway without Tim, Heidi, and Michael? I have lowered my expectations. At least that way I might be pleasantly surprised.

(Tim & Heidi)
Wednesday, October 19, 2011
Worth every minute!
Sunday was Metal Studio Day again, something a small group of us try to do once a month. Often we go in 12 different directions, and just do our own thing, but this time we decided to tackle one project together.

The project on the cover of the Oct-Nov 2011 issue of Step by Step Wire Jewelry had been calling out to us ever since we received the issue in the shop last month. The colors are "my colors" - seems like I am always returning to blue and green when I make jewelry, and green and blue look so fabulous with copper!
This necklace was a mix of cold connections and wire work, and we knew it would take a large chunk of time to create, so we gathered at 9:30 Sunday morning, and started to create.
I have to say that this project was unusually poorly written for a Step by Step Wire project; I can't recall ever seeing such vague instructions in a Step-by-Step project. To begin with, rather than telling you how much wire to use for the base piece, the instructions call for working directly off the wire spool, and coiling until "you have the right size". Yet the "right size" is never specified, and when a group of people are trying to create a project where they are sharing one spool of wire, they can't all "work off the spool" - an approximate length, and a template, would have been very helpful. So we spent quite some time on this step, futzing around, and wasting a lot of wire.
The size of this coiled wire base - its width, the height of its coils, and the number of coils - is critical to all the rest of the steps in the project, and determines the number and size of the beads and domed copper cups that will fill in the design. Without any clear measurements provided by the project, we sort of worked in the dark, cutting and doming our copper cups ("Make as many as you like.") while the base coil tumbled, not knowing really how many or what sizes we needed. But we made several different sized domed cups, and then had fun rummaging through the shop looking for green, blue, and brown beads to add to our project.
 I decided to patina some of my copper cups using a method described in my brand new copy of Jewelry Lab.
This is an exciting book for metal workers - loaded with tips, tricks, and project ideas. I am particularly excited about the patina section right now, and after my success with the colored pencil & gesso technique, I can't wait to try more ideas from this book.

These are my colored-pencil patinated discs - I really like how they turned out, and it was so easy!

Assembling the necklace was tricky, as we discovered that getting the beads and copper cups to wrap tightly was not going to work as described in Step 6. We each attached 4 or 5 units according to these instructions, and they slid and wobbled on the base, so we figured out how to use some 24g wire to stabilize their attachments, and then we modified the attachment instructions for the rest of the units, to get a nice tight wrap onto the coil.
We finished the project, attaching the copper chain and S-hook as the last step, at 7:30 PM. So from start to finish, 10 hours. And worth every minute. Though some measurements and a template for the base coil would have saved us over an hour - but, to use my very least favorite colloquialism, it is what it is.

 I am absolutely thrilled with my finished necklace, and now that I have completed the project and worked out the kinks, I am ready to make another one!
Edited 10/24/11 to add: In respect to the Step-by-Step Wire project instructions: A customer came into my bead shop on 10/22/11 and perused this particular article after noticing the project picture on the front of the issue. After about 4 minutes, she commented on how badly written the instructions were, and asked how she was supposed to know how much wire to purchase in order to make the project? Good point - I had only looked at it from the aspect of making it as a group; as a bead shop owner, I had not even considered the difficulty a customer would encounter if trying to purchase supplies for this project.

The project on the cover of the Oct-Nov 2011 issue of Step by Step Wire Jewelry had been calling out to us ever since we received the issue in the shop last month. The colors are "my colors" - seems like I am always returning to blue and green when I make jewelry, and green and blue look so fabulous with copper!
This necklace was a mix of cold connections and wire work, and we knew it would take a large chunk of time to create, so we gathered at 9:30 Sunday morning, and started to create.
I have to say that this project was unusually poorly written for a Step by Step Wire project; I can't recall ever seeing such vague instructions in a Step-by-Step project. To begin with, rather than telling you how much wire to use for the base piece, the instructions call for working directly off the wire spool, and coiling until "you have the right size". Yet the "right size" is never specified, and when a group of people are trying to create a project where they are sharing one spool of wire, they can't all "work off the spool" - an approximate length, and a template, would have been very helpful. So we spent quite some time on this step, futzing around, and wasting a lot of wire.
The size of this coiled wire base - its width, the height of its coils, and the number of coils - is critical to all the rest of the steps in the project, and determines the number and size of the beads and domed copper cups that will fill in the design. Without any clear measurements provided by the project, we sort of worked in the dark, cutting and doming our copper cups ("Make as many as you like.") while the base coil tumbled, not knowing really how many or what sizes we needed. But we made several different sized domed cups, and then had fun rummaging through the shop looking for green, blue, and brown beads to add to our project.

This is an exciting book for metal workers - loaded with tips, tricks, and project ideas. I am particularly excited about the patina section right now, and after my success with the colored pencil & gesso technique, I can't wait to try more ideas from this book.

These are my colored-pencil patinated discs - I really like how they turned out, and it was so easy!

Assembling the necklace was tricky, as we discovered that getting the beads and copper cups to wrap tightly was not going to work as described in Step 6. We each attached 4 or 5 units according to these instructions, and they slid and wobbled on the base, so we figured out how to use some 24g wire to stabilize their attachments, and then we modified the attachment instructions for the rest of the units, to get a nice tight wrap onto the coil.
We finished the project, attaching the copper chain and S-hook as the last step, at 7:30 PM. So from start to finish, 10 hours. And worth every minute. Though some measurements and a template for the base coil would have saved us over an hour - but, to use my very least favorite colloquialism, it is what it is.


Edited 10/24/11 to add: In respect to the Step-by-Step Wire project instructions: A customer came into my bead shop on 10/22/11 and perused this particular article after noticing the project picture on the front of the issue. After about 4 minutes, she commented on how badly written the instructions were, and asked how she was supposed to know how much wire to purchase in order to make the project? Good point - I had only looked at it from the aspect of making it as a group; as a bead shop owner, I had not even considered the difficulty a customer would encounter if trying to purchase supplies for this project.
Monday, October 10, 2011
BSBP Revisited
I wanted to visit the Bead Soup Blog Party (BSBP) one more time, this time giving you a look at my favorites, in no particular order. I hope you'll take some time to visit their blogs and read how these creations came to life! (Note: these photos and all rights to them belong to these talented designers!)
I love this multistrand necklace created by Tiffany Long of Glory Hound Designs:

These colors are so delicious, and I love how she put the softness of the flowers with the hardness of the chain, and then added the colorful, whimsical silk ribbon at the back. And of course, all the embellishments! This reminds me of the multistrand dragonfly necklace I designed a few months ago; all the beads and chain and embellishing - I love making complex pieces like this, and I appreciate the time and effort Tiffany put into her gorgeous design, and I could definitely see myself wearing it!
Feast your eyes on this beautiful design, by Manuela Wutschke:

I love how Manuela started with the beautiful silver flower and accompanying silver bud, and turned them into a flowing, organic necklace that really looks like she plucked it from a garden! Beautiful blues and greens, and then a little unexpected touch of yellow; and the textures she has used are wonderful - so varied, just like in the garden. And I just have to add how much I enjoyed reading Manuela's design process in her post - she showed her sketches (whereas I did not show mine), and I was struck by how we both seemed to approach our designs in similar ways. I just love reading the gory details that go into jewelry designs!
This beadwoven necklace by Karin Slaton of Backstory Beads couldn't help but make my list!

Her brass flower focal (which looks like a silk flower to me!) is incredible, and she has hand woven these beautiful matching peyote beads and tubes to create a gorgeous necklace. I love her earthy color palette, and I love peyote - there is just so much you can do with this versatile stitch!
And take a look at this beautiful choker, created by Suzann Wilson, of Beadphoria:

Where do I begin? I love working with (and wearing) black, red, and white, and I love pearls - the bigger, the better! And this beautiful clasp - what a find! It makes a beautiful focal! Adding the sparkling crystals gives this a wonderful vintage feel, and it reminds me of the jewelry my grandmother used to let me play dress-up with. And I appreciate the work that goes into getting the strands of a multistrand piece to all be the correct length!
So that is my last look at BSBP - I saw so much beautiful jewelry, and I appreciate all the folks that took the time and effort to read and comment about my creations, and to visit all the other participants!
I love this multistrand necklace created by Tiffany Long of Glory Hound Designs:

Feast your eyes on this beautiful design, by Manuela Wutschke:

I love how Manuela started with the beautiful silver flower and accompanying silver bud, and turned them into a flowing, organic necklace that really looks like she plucked it from a garden! Beautiful blues and greens, and then a little unexpected touch of yellow; and the textures she has used are wonderful - so varied, just like in the garden. And I just have to add how much I enjoyed reading Manuela's design process in her post - she showed her sketches (whereas I did not show mine), and I was struck by how we both seemed to approach our designs in similar ways. I just love reading the gory details that go into jewelry designs!
This beadwoven necklace by Karin Slaton of Backstory Beads couldn't help but make my list!
Her brass flower focal (which looks like a silk flower to me!) is incredible, and she has hand woven these beautiful matching peyote beads and tubes to create a gorgeous necklace. I love her earthy color palette, and I love peyote - there is just so much you can do with this versatile stitch!
And take a look at this beautiful choker, created by Suzann Wilson, of Beadphoria:

So that is my last look at BSBP - I saw so much beautiful jewelry, and I appreciate all the folks that took the time and effort to read and comment about my creations, and to visit all the other participants!
Tuesday, October 4, 2011
Sterling + Resin = Stunning Necklace!
Here is the second design I created last week:

The pendant has its origin in my foray into turning scrapbooking components into jewelry.
My friend Sonya had been watching videos and reading articles & books about Ice Resin, and wanted to try it. So we scheduled a day to meet and just play with bezels, found objects, glitter (!), scrapbooking stuff, and Ice Resin.
And before our play date arrived, I wanted to experiment with making a bezel, so I cut two 12-inch pieces of 14g sterling silver wire and hammered (and hammered and hammered) each piece until they were about 8mm wide. I wanted them to look hammered, so I made sure I only hammered the pieces on one side, and the result was 2 curved, unbelievably hard pieces of sterling. There was going to be NO opportunity to bend these pieces at all unless I annealed them, and I didn't want to deal with firescale, pickling, etc. I wanted to get my bezel done.
Fortunately, the 2 pieces of sterling wire were curved almost identically at their ends, yet curved in opposite directions in the middles. I decided to use this to my advantage, and I wire-wrapped both ends, which was a bit of a struggle, but I finally got them secured. The hardest part was muscling one of the wires into a big loop for the bail, and getting it to stay with the other wires while I did the top wrap. The bail wasn't turned the way I wanted it to be, but I knew that could be overcome somehow when it came time to design the necklace. Then all that was left to do was turn the wire ends a little to complement the middles - I used my round nose pliers, and every bit of upper body strength I could muster. The wire was really work-hardened! But I had a nice, oval bezel to play with.
Play date! Sonya and I spent a lot of time just perusing all the different things we had to work with, and deciding what bezels were going to receive what goodies - this was fun!
Sonya had brought in a beautiful selection of scrapbooking papers, and I chose a piece with teal and pink garden scenes to create the backing for my bezel. I cut it to fit, and glued it around the edges to the back of my bezel. My bezel was not exactly flat - another fault of the work hardened wire, but the Ice Resin is self-leveling, so I knew if I could get the bezel to lie flat when we did the resin pour, then the resin would level out and everything would be perfect.
I poured a little bit of resin into the bezel, and then placed a bouquet of white paper flowers on top of this resin, and then "filled" the bezel with resin. I levelled the bezel (I thought) with a scaffolding of paper shims, cardboard shims, and toothpicks. Looked level to me. Ha!
This was our first time working with resin, and we had overpoured. Big time. Then I discovered that my bezel wasn't really level, despite my levelling efforts, so it was full at the top, bottom, and on one side, but had a huge, scooped-out looking defect on the other side. This is no big deal - I just had to re-level the bezel, and repour some resin. And I overpoured again, but once it cured and I did the clean up, the bezel was full, so I was happy. I polished the bezel with my Dremel, and set it aside to think about how to design around it.
I chose a lovely sterling silver chain with large, open links that have been hammered and textured. Since my bail was turned 90 degrees in the wrong direction, I couldn't just run the chain through the bail, and had to figure out how to attach the chain to the pendant. Once I figured this out, I wanted to add some embellishment to fill the space between the chain and the pendant, I had some tourmaline nuggets that matched the teal in the pendant perfectly, and dangled these on sterling chain in a cluster around the bail.
The larger links on the chain were the perfect size for a toggle bar, so I decided to do something I have never done before: A front closure. I have done plenty of side closures, but never a front closure. I selected a long, textured toggle bar and attached it to one end of the chain, and looped it through the large link on the other end of the chain. Closure!

I loved the way the tourmaline dangles pulled the teal out of the pendant, so I decided to add a few to the links in the chain. Voila!

And it's available in my Etsy Shop!
Sonya and I learned a lot about Ice Resin - it is fun, it is very forgiving, it is messy, it is self-leveling, and you can turn just about anything into a nice piece of jewelry with it. If you'd like to learn how to use Ice Resin, Sonya is going to be teaching an Ice Resin class at Yaya Beads later this month - give it a try!
Have a great day!

The pendant has its origin in my foray into turning scrapbooking components into jewelry.
My friend Sonya had been watching videos and reading articles & books about Ice Resin, and wanted to try it. So we scheduled a day to meet and just play with bezels, found objects, glitter (!), scrapbooking stuff, and Ice Resin.
And before our play date arrived, I wanted to experiment with making a bezel, so I cut two 12-inch pieces of 14g sterling silver wire and hammered (and hammered and hammered) each piece until they were about 8mm wide. I wanted them to look hammered, so I made sure I only hammered the pieces on one side, and the result was 2 curved, unbelievably hard pieces of sterling. There was going to be NO opportunity to bend these pieces at all unless I annealed them, and I didn't want to deal with firescale, pickling, etc. I wanted to get my bezel done.
Fortunately, the 2 pieces of sterling wire were curved almost identically at their ends, yet curved in opposite directions in the middles. I decided to use this to my advantage, and I wire-wrapped both ends, which was a bit of a struggle, but I finally got them secured. The hardest part was muscling one of the wires into a big loop for the bail, and getting it to stay with the other wires while I did the top wrap. The bail wasn't turned the way I wanted it to be, but I knew that could be overcome somehow when it came time to design the necklace. Then all that was left to do was turn the wire ends a little to complement the middles - I used my round nose pliers, and every bit of upper body strength I could muster. The wire was really work-hardened! But I had a nice, oval bezel to play with.
Play date! Sonya and I spent a lot of time just perusing all the different things we had to work with, and deciding what bezels were going to receive what goodies - this was fun!
Sonya had brought in a beautiful selection of scrapbooking papers, and I chose a piece with teal and pink garden scenes to create the backing for my bezel. I cut it to fit, and glued it around the edges to the back of my bezel. My bezel was not exactly flat - another fault of the work hardened wire, but the Ice Resin is self-leveling, so I knew if I could get the bezel to lie flat when we did the resin pour, then the resin would level out and everything would be perfect.
I poured a little bit of resin into the bezel, and then placed a bouquet of white paper flowers on top of this resin, and then "filled" the bezel with resin. I levelled the bezel (I thought) with a scaffolding of paper shims, cardboard shims, and toothpicks. Looked level to me. Ha!
This was our first time working with resin, and we had overpoured. Big time. Then I discovered that my bezel wasn't really level, despite my levelling efforts, so it was full at the top, bottom, and on one side, but had a huge, scooped-out looking defect on the other side. This is no big deal - I just had to re-level the bezel, and repour some resin. And I overpoured again, but once it cured and I did the clean up, the bezel was full, so I was happy. I polished the bezel with my Dremel, and set it aside to think about how to design around it.
I chose a lovely sterling silver chain with large, open links that have been hammered and textured. Since my bail was turned 90 degrees in the wrong direction, I couldn't just run the chain through the bail, and had to figure out how to attach the chain to the pendant. Once I figured this out, I wanted to add some embellishment to fill the space between the chain and the pendant, I had some tourmaline nuggets that matched the teal in the pendant perfectly, and dangled these on sterling chain in a cluster around the bail.
The larger links on the chain were the perfect size for a toggle bar, so I decided to do something I have never done before: A front closure. I have done plenty of side closures, but never a front closure. I selected a long, textured toggle bar and attached it to one end of the chain, and looped it through the large link on the other end of the chain. Closure!

I loved the way the tourmaline dangles pulled the teal out of the pendant, so I decided to add a few to the links in the chain. Voila!

And it's available in my Etsy Shop!
Sonya and I learned a lot about Ice Resin - it is fun, it is very forgiving, it is messy, it is self-leveling, and you can turn just about anything into a nice piece of jewelry with it. If you'd like to learn how to use Ice Resin, Sonya is going to be teaching an Ice Resin class at Yaya Beads later this month - give it a try!
Have a great day!
Sunday, October 2, 2011
New Beaded Wire-Wrapped Bangle
Happy October!!
I have had such a productive week! I completed 3 brand new designs, start to finish, plus I finished a custom-ordered kumihimo necklace and matching bracelet, and totally wowed their new owner. Always such a relief when the customer is happy!
I am so fortunate to have a full-time studio to work in - a dedicated place to design, create, photograph, and sell my work. But the downside is that it is 45 minutes away from my home, and I frequently leave all my computer work for my evenings and days off, and then realize I've left my memory card, or flash drive, or some other important documents sitting on the computer at work. And that's where I find myself today.
I was so proud to finish all these designs AND get all the pics taken and downloaded and edited, all in the same week! And now I find myself ready to blog about it, and my pics are literally in another state. So I will give you a little taste of one of my creations, and leave the rest for later on.

This is an absolutely delicious, lush, beaded sterling silver bangle. These red-banded agate beads are 12mm rounds, faceted and highly polished, and I fell in love with their rich coloration and swirls. The pinks range from the palest pink to a deep fuchsia, and the beads are so polished they literally look wet. They reminded me of freshly picked and washed raspberries! (I actually took to calling them "raspberry agate"). The minute I found these beads I nabbed them and stuffed them into my stash (you know what I'm talking about - we are all bead hoarders!), just waiting for the right project. And now I wish I had another strand!
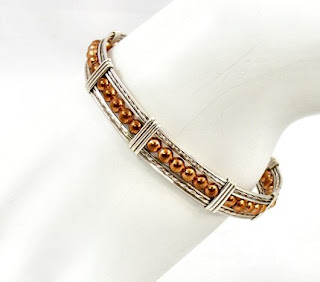
This is a beaded wire bangle that I have made a number of times - it calls for 4 mm beads, and is fun to make. So I figured - 4mm, 12mm - what's the difference? Well, not exactly, but that's sort of what I thought - I figured I would just have to make a few "modifications" for the larger beads.
Ha!!
These beads were SO much bigger, and SO much heavier, that this became an almost overwhelming issue of engineering. I had to account for the bangle itself being wider, as well as the sizing being completely different because of the beads' diameter, and I also had to buttress the wires themselves just to get them to stay in bundles as I wrapped.


Many thanks to those of you who took the time to read my BSBP essay and leave comments. I visited each and everyone of my fellow BSBP participants, read every word, and was awed by all the talent.I know what a time commitment it was for those who blog-hopped for BSBP, and I truly appreciate your efforts and words. Thanks again!
I have had such a productive week! I completed 3 brand new designs, start to finish, plus I finished a custom-ordered kumihimo necklace and matching bracelet, and totally wowed their new owner. Always such a relief when the customer is happy!
I am so fortunate to have a full-time studio to work in - a dedicated place to design, create, photograph, and sell my work. But the downside is that it is 45 minutes away from my home, and I frequently leave all my computer work for my evenings and days off, and then realize I've left my memory card, or flash drive, or some other important documents sitting on the computer at work. And that's where I find myself today.
I was so proud to finish all these designs AND get all the pics taken and downloaded and edited, all in the same week! And now I find myself ready to blog about it, and my pics are literally in another state. So I will give you a little taste of one of my creations, and leave the rest for later on.

This is an absolutely delicious, lush, beaded sterling silver bangle. These red-banded agate beads are 12mm rounds, faceted and highly polished, and I fell in love with their rich coloration and swirls. The pinks range from the palest pink to a deep fuchsia, and the beads are so polished they literally look wet. They reminded me of freshly picked and washed raspberries! (I actually took to calling them "raspberry agate"). The minute I found these beads I nabbed them and stuffed them into my stash (you know what I'm talking about - we are all bead hoarders!), just waiting for the right project. And now I wish I had another strand!

This is a beaded wire bangle that I have made a number of times - it calls for 4 mm beads, and is fun to make. So I figured - 4mm, 12mm - what's the difference? Well, not exactly, but that's sort of what I thought - I figured I would just have to make a few "modifications" for the larger beads.
Ha!!
These beads were SO much bigger, and SO much heavier, that this became an almost overwhelming issue of engineering. I had to account for the bangle itself being wider, as well as the sizing being completely different because of the beads' diameter, and I also had to buttress the wires themselves just to get them to stay in bundles as I wrapped.

So I added lots of wraps along each side of the wire - these started out to be structural elements, but after I had done a few, I realized they looked great, so I decided to make a pair between each bead. These wires added both strength and texture to the bangle.
And while the sterling silver wire is perfect with these bright pink beads, the beads themselves are the real stars in this bracelet! This is such a bright, bold, dramatic accessory for so many different occasions. It can be dressed up, dressed down - it is so much fun! And it's available in my Etsy shop!

Many thanks to those of you who took the time to read my BSBP essay and leave comments. I visited each and everyone of my fellow BSBP participants, read every word, and was awed by all the talent.I know what a time commitment it was for those who blog-hopped for BSBP, and I truly appreciate your efforts and words. Thanks again!
Subscribe to:
Posts (Atom)


 Posts
Posts


