Showing posts with label fringe. Show all posts

Thursday, July 5, 2012

Zombie No More - The Iolite Fringe Necklace

It's done!


I am so excited (and relieved)!

The low down:
  • 30 feet of sterling silver wire
  • 75+ grams of seed beads
  • 2 strands of iolite briolettes
  • 2 strands of white freshwater pearls
  • 4 strands of silver vitrail Czech firepolish beads
  •  6 sterling silver crimp covers
  • 1 sterling silver locking magnetic clasp
  • well over 100 hours of labor

I absolutely love the finished necklace! The fringe cascades around the necklace, giving it gorgeous movement. It is 24 inches long, which is just perfect for this piece.


magnetic clasp - love the basket weave pattern!

fringe detail from the center (front) of the necklace

I am not going to rehash the history of this necklace - If you are interested, you can find most of it here. But, to make a long story short, I started this necklace in Fall, 2008, and put it away unfinished because it was so tedious. This year, I decided to commit to finishing some of my (hundreds of) unfinished projects, and this was the first one I tackled. I started it 4/13/12, and finished it this morning. There were quite a few set backs along the way, but I have something beautiful to show for all my work!

And it's available in my Etsy shop!

I want to thank my cheerleaders, who have cheered me on as I toiled: Maggie, Halinka, Karin, and Sonya. Thanks, ladies!

Now that this project is finished and off my worktable (!) I can move on! I have several NEW beadweaving projects picked out - I have been dying to start a new project! And after I finish a few of these new projects, I'll be digging up a new zombie - you won't want to miss that!

Maybe I should get some of this stuff, and spray all my new projects with a good coating, to make sure I don't give rise to any new zombies:

Wednesday, June 27, 2012

Wednesday Worktable

I can see the light at the end of the tunnel - it's dim, but I see it!

Only 5 inches of fringe to go!

When I scrutinize the necklace, and this picture, I can see slight differences between the 2 sides, but no more do-overs for this zombie! I am moving forward only, and could conceivably be done by next week. Depends on what else lands in my lap!


Wednesday, June 13, 2012

Wednesday Worktable

I officially reached the halfway point of my Zombie Fringe Necklace yesterday evening, a few minutes after 6PM. (Click on that link if you want to see the history of this project.)

The fringed portion is about 2.5 inches longer than it was when I posted last Wednesday, so I continue to progress about 1.2 inch per session - so slow and tedious!

I am feeling very starved creatively, with lots of ideas rolling around in my head, so I am making a new resolution - I am going to work on this necklace on my days "off", too - (whoopee! a whole extra inch of progress per weekend!) - but I simply have to get this necklace off my workbench so I can move on to some new designs!.

The challenge now is to see how I feel about this new resolution when "Pajama Days" roll around this weekend!

Wednesday, April 25, 2012

Wednesday Worktable

Still toiling with my Zombie Iolite Fringe Necklace. It is tough going, folks! Now I think I have a clue why it became a zombie in the first place!

This picture shows the current transition zone between full fringe (on the left), and where I left off 4 years ago:
My biggest problem is remembering how I was doing the fringe way back then - I study the necklace, and study it, but still don't feel like I am getting it right. I have completed about 2 inches, and if you really study it, you can tell the new part, because it is actually a little fuller than it should be.

I'm not really enjoying this, but this particular project is the worst of the zombies - the one I had dread in my heart for, so once it is done, and I WILL finish it, the rest will seem easy! It may just take several weeks, at the rate I'm going. But I haven't started any new projects, either - so that is a plus!

Happy Wednesday!

Friday, April 13, 2012

Friday the 13th - Let's Dig up a Zombie!!

As I told you earlier this week, I have lots and lots and lots of partially finished jewelry designs. I get started on one, full of enthusiasm, and then get attracted to another bright shiny project, and forget all about the first. And before you know it, I need to rent a storage unit to house all these "dead" projects.

Of course, we all know this is NOT my storage unit, because it is too neat! LOL

So anyway, I decided that something needs to be done about all these unfinished projects - they date as far back as 2007! So I have decided to resurrect these dead projects, one at a time, until I have cleared out all boxes of unfinished projects!

And what else would you call unfinished projects that are brought back from the dead, except "Zombies!"


The first Zombie project I am reviving dates back to 2008: it is a hybrid (mixed media) design involving both wire crochet and beadweaving. I call it Iolite Fringe, and I first showed it here in a post back in December, 2008! It's interesting to go back and read that post, because you can almost smell the Zombie starting to decompose, as I talk about how tedious the fringing is, and how it is going to take forever to finish. And I was right!! I have been "working on" this project for 3.5 years, and it's still not done!

This is box 1 of the 2 boxes which house my zombie beadweaving projects:


Here is the bag containing the iolite fringe project, untouched since 2008:


The poor necklace is in there, along with all the seed beads and gemstones.
I opened the bag, and pulled out the necklace:
If you look at the necklace, you can see that over on the right side, the fringe is nice and full, and essentially finished. But that leaves the front and the left side still undone, and then my absolute least favorite part - the ends! The bag in the center contains the gorgeous top-drilled iolite I am using (I love iolite!), and the other containers are the various seed beads I am fringing with.

On the left side of the necklace you can see a bit of a bend in the base of the wire crochet necklace - this was the only negative effect suffered the years of captivity in the Ziploc bag in the bottom of the box, and I was able to easily manipulate the wire back into shape, so yay!


This is the fringe portion at the bottom of the necklace. My goal is to add enough passes of fringe that the wire base is no longer visible. The challenge will be to replicate my weaving style from 3 years ago - and I suspect this will be the hardest part for me, because as we grow in our beading skills and influences, our style changes so much!

So, this is my first Zombie project - I will start working on it later today, and will finish it when I finish it. I know it got put away because it was too tedious, and that's what has kept it locked up for years, but I must attack the zombie with all my willpower, or it will defeat me!

And while I am fully resolved to clearing out the unfinished projects, I make absolutely NO promises to not start any NEW projects along the way - a girl's gotta have a little fun, you know!

Sunday, May 8, 2011

Just for me!

Last week I bought a ($5.00!!) green and blue T-shirt at WalMart; green and blue are my favorite colors, and this is just the cutest shirt. So cute, in fact, that my friend Sonya, who also works with me, bought the same one (separately, and she also bought the same gorgeous grey and purple one I bought! Great minds think alike!) so now we have to call each other the nights before we work together to make sure we won't be twinsies!

So naturally, I needed some bling to wear with my new shirt, so I made this necklace, bracelet, and earring set to go with my new shirt:


Russian spiral necklace, with green 11s and blue 8s.


Rear closure, which IMO must be as pretty as the rest of the necklace!


 Matching green and blue fringe bracelet; nice and full., I used 6s, 8s, 11s, 4mm cubes, 4mm Swarovski bicones (in peridot AB), and 4mm Czech firepolish rounds. I have taught this fringe bracelet a couple of times, but have never actually made one myself, so this is my very first fringe bracelet, and I love it. Must make more!


Matching Earrings

Some lovely blue and green lampwork beads had gone unsold in the shop for quite a long time, and they matched the necklace and bracelet perfectly, so I paired them with some Bermuda blue Swarovski Cosmic rings to make these dangle earrings.

And besides the fact that I have this great set of matching jewels to go with my new shirt, I got an idea for a totally new design, that I hope to work on next weekend.

I'd show you a picture of the shirt, but it is wadded up in the hamper, plus the camera is over at the shop in Augusta. I'll try to remember to get a pic of the whole ensemble together.

'Til next time. TTFN!

Sunday, January 30, 2011

Evolution of a design

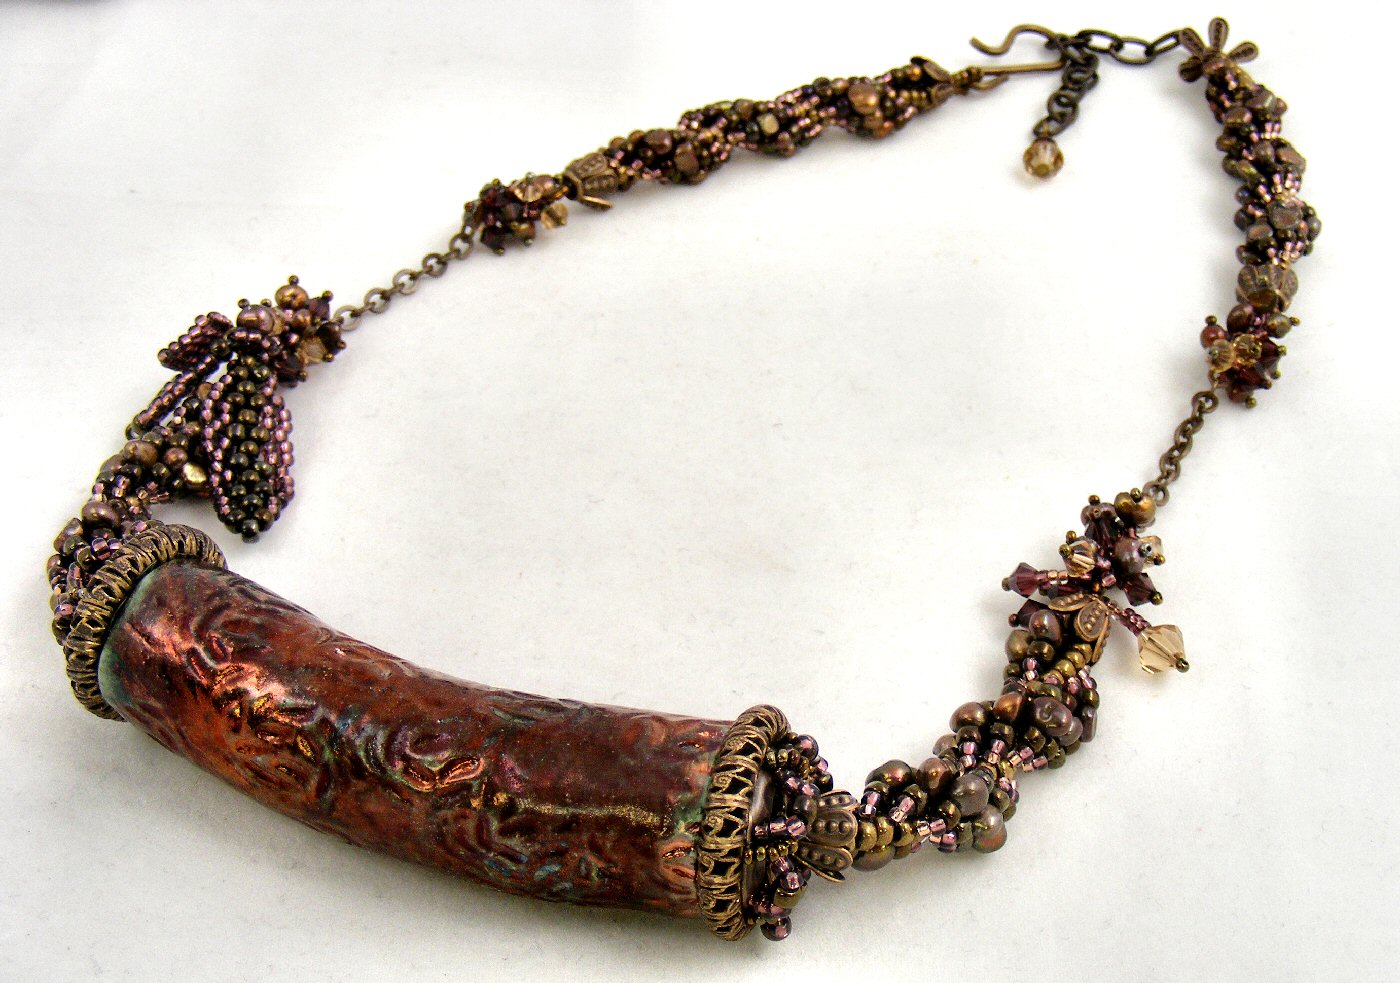
I had this gorgeous, large, burgundy Raku bead, and my original plan was to braid a simple beaded kumihimo rope to suspend it from.

But this design quickly became a study in problem solving, with problem #1 being that I didn't have any matching seed beads in a size that would work up into a beaded kumihimo rope.

So I decided I would fall back on one of my favorite beadweaving stitches, the spiral.

I had too many bead choices here, and had to play with them, and keep narrowing them down, so that I didn't end up with a overly busy or chunky spiral rope that would overwhelm the bead, despite the bead's size.

Because this raku cylinder bead was huge - almost 4 inches long, with a very large hole running through it.


This is the spiral I finally decided on: brown freshwater pearls, mauve seed beads, burgundy seed beads, olive green seed beads, and copper seed beads for the core. After stitching this 2 inch length, I came upon problem #2: how to cap the large raku bead?

I spent a couple of days working on this beadcap issue. I stitched a number of different attempts from seedbeads, in various sizes, and various patterns, but none of them worked; they needed to be relatively flat on the end, and then immediately flare out pretty widely, and then hug the bead.

And no ready-made beadcaps were anywhere near the size of this bead's end, so I kept stewing, and started looking around for anything I could use to cobble together a suitable beadcap.


I finally found a combination of Vintaj brass findings that I felt, theoretically anyway, could work.  I used metal punch pliers to punch 6 holes in a Vintaj brass ring, to correspond with the placement of the 6 petals on the Vintaj flower.


These are the 3 Vintaj components I finally settled on - the larger ring is a good size for the end of the Raku bead.


Here is how the 3 components stacked in my plan -  now I just had to get them to stay fastened together (and attach them to the bead!)

I made a number of attempts to wire-wrap the components together, but wasn't happy with any of the results.


So I decided to weave the components together with seed beads, and after several more tries, this is the (somewhat over-exposed, sorry) result. 

I then used 20g Vintaj brass wire to wire the caps to the bead, and then attached a length of spiral to each end.  The original plan, after settling on the spiral, was to have the whole necklace be a simple spiral, but by now I had so mych time and energy invested that I decided to glam it up, and added a short length of Vintage brass chain with fringe embeliishment comprised of Swarovski crystals and freshwater pearls to each side, before continuing on with the spiral rope.


Of course, I had to do some more embellishing, so I added fringe to one side, and some freeform peyote leaves to the other.


Then I finished with a Vintaj brass S-hook and extender chain, providing an adjustable finished length.


Tuesday, December 30, 2008

End of the Year Catch-up


Soooooo, my friend Lynn (half of the very talented GimmeBeads) gave me this hand-painted (by her) rock for Christmas - allegedly, it was inspired by and looks like me -
I love my picturesque rock! Although I'm not sure I have ever looked this good.
Visit Lynn and Mike's shop, soon to be known as "GimmeBeads, and GimmeRocks, while you're at it" - they're great peeps!

And now, back to the whining I was doing here.
This is the brown wire crochet necklace I made a few weeks ago - my first attempt at this medium. It includes both brown and champagne-colored freshwater pearls, pressed glass beads, Czech fire-polished beads, and seed beads. I finished it with copper cones and a copper toggle, and I am thrilled with it - it matches a couple of my outfits beautifully, and it was a lot of fun.

This is a close-up of my brown wire crochet necklace.


As I discussed last time, I decided to make a second wire-crochet necklace, this time using some gorgeous deep blue iolite chips, which I paired with some silver-blue AB Czech fire-polished beads and some white freshwater pearls.
But feeling it was a little plain-looking (I now realize this was because I used fewer, and smaller, beads than in the brown one), I decided I needed to improve on it somehow, and started adding fringe.
5 and 1/2 days of beading later, I finished the first pass of fringe, at 1:30 this morning.
This is a closeup of the fringed necklace, as it currently exists.
I keep saying this is the first pass of fringe, because the fringe is a little sparse to me in some places (I'm not saying this is a bad thing), but I feel like I've obscured the pearl and iolite framework that defined the whole thing, and even though I like the result thus far, I still feel it isn't quite right.
I clearly need my head examined - this has been 6 days of beading, and I want to do MORE??
So at the shop today, I decided to get a second opinion. I asked one of my part-time employees, who had popped in to do a little shopping. She told me I needed to remove all the fringe, and just leave the basic crocheted wire necklace.
Well I never. (As we say in the South)
And so I decided to keep asking for opinions until I got the one I wanted, as you do.
Later this afternoon, a customer who bead-weaves quite a bit came in, and I presented the whole situation to her, and she told me the fringe was absolutely perfect, and to just stop now.
So, I'll be getting a third opinion tomorrow.
As I have explained to the wise Carol Dean Sharpe, I often feel like my Etsy Shop has cooties. (Remember cooties, folks - back in 6th grade?) Anyway, my beautiful designs sit on the shelves of my poor shop, pining away for a good home, and I get a sale every 3 or 4 months, just to keep me hanging on.
But now that my designs are also on display in my bead shop, I sell 2 or 3 things daily that are also listed on Etsy - and these are the ones that sold today:
These striking magnasite rondelle earrings, accented with sterling silver and Swarovski crystals. The necklace that matched them actually sold from my Etsy shop over a year ago or so - and now the earrings have finally found a great home.


Then these gorgeous rose gold and sterling silver hoop earrings sold!
I just wish there was some magical way for me to mark all these things as sold in my Etsy shop, instead of just deleting them - I feel like it would be a truer reflection of my success, but whatEVER.

Happy New Year, everyone!

Friday, December 26, 2008

12-26-08

I decided to close the shop today, and enjoy a day off - I'm not one of those after-Christmas shopper/returners, and I really did not want to fight the traffic to get to my shop, plus I really didn't think most after-Christmas shoppers would be hitting up the bead shop.
So I'm home today with Bailey, doing some beading (that is, I'm doing the beading, Bailey's doing the napping).

This is my latest project:
I've been experimenting with silver crochet, and enjoying it.
In my first project I used a mixture of brown freshwater pearls, champagne freshwater pearls, several earthy, shiny colors of Czech fire-polish beads, and some taupe pinch beads.

It turned out beautifully, with a very organic look, and goes with a lot of my outfits, but it's just kind of plain, for me.

For my second attempt, I chose gorgeous iolite chips, white freshwater pearls, and 4mm silver AB finish Czech fire-polished beads. I love the colors, and the combination, but I just felt like it still lacked "oomph."

So the beadweaver in me jumped up and insisted that I embellish it with fringe. I should make it very clear at this point that I HATE adding fringe to stuff, and usually limit it to a few (as in less than 10) strands on a peyote bail, or some such.

But yet, this seemed like a good plan to me.

Emphasis on "seemed."

It took me maybe 4 hours to croched the necklace you see above.
When I finished, I picked some matching seedbeads, and started adding fringe. 2 and a half DAYS later, I had fringed 6 inches of this necklace, and realized that although I kind of like how it's turning out,
a) the fringe isn't full enough, so when I complete this pass, I will have to go back and add a second full pass of fringe.
b) this is going to take forty forevers to finish.


This shot shows the current status - the point where fringe meets unfringed,


and here's how the first few inches look - the fringe is just a little too sparse for me.
I worked on it for 2 hours this afternoon, while watching some "Bones" reruns I Tivo'd Christmas Eve. Then I just HAD to take a break.
Fringing is tedious.
I was going to work on it some yesterday, but then I got a reprieve - a friend called and invited me to go to dinner and a movie with her and her fiancee. She and I voted for "Marley and Me", but the fiancee voted for "The Curious Case of Benjamin Button," stating that "Marley and Me" was a chick flick, and he wouldn't be caught dead in a chick flick. And he figured Brad Pitt would never MAKE a chick flick.

So we saw Benjamin Button, and as we were filing out, my friend asked Mr. Macho Fiancee what he thought of it, and his snarly response was "Chick Flick". Of course, we were laughing hysterically at this, as he defensively responded that it was a "love story", and hence a chick flick. And that we should have seen "Valkyrie". Good grief.

Then we tried to find some place open for dinner at 10 PM. In Augusta, Georgia. Know what's open at 10PM on Christmas Day in Augusta? Convenience stores, and Waffle House. So we had a delicious post-chick flick meal at the Awful Waffle. Of course, the Waffle House near the theater was already packed, undoubtedly with like-minded movie folk, so we drove several miles to the next closest one.

Just a little clue for restaurants and bars, especially in this area - opening up for the dinner and theater crowd on Christmas evening = good for business... Just saying...

And now I have run out of excuses to not fringe, so I guess I'll go back to it.