Showing posts with label spiral. Show all posts

Monday, July 1, 2013

Purple Spiral Necklace with Top-drilled crystals

I love top-drilled Swarovski crystals. But I have no idea how to use them. Am I the only one that buys beads and doesn't know how to use them?

I bought hundreds of these 6 years ago at a gem show, in probably 30 different colors. They fascinated me! And they have been sitting there, mocking me, ever since. And no one at the bead shop buys them, either - I think folks are confused by top-drills. That's my theory, anyway.

So, I decided to play with some of these last week, and since I am on a purple kick, I chose the lilac ones.
I decided I would cluster them in the center, like ripe grapes, because they REALLY have an impact when they are clustered together!

I chose a simple, "skinny" spiral to complement these sparkly crystals:


I added some 6mm Czech pressed glass beads, in a pretty tanzanite color, throughout the rope as accents.

This pretty, dainty handwoven necklace is available on Etsy!

Friday, April 26, 2013

What's new? A spiral rope bracelet, and a metal challenge

I know it looks like I've been ignoring my blog, slacking off ... not true!

A few weeks ago, I was selected to participate in the 5x5 challenge over on Artisan Whimsy. For this challenge, 5 designers were each sent 5 metal components (we were all sent the same 5 components - shown below), and our challenge was to play with them, test them, and design with them. Easy, right?

metal components for 5x5 challenge

The challenge ends today, and our designs will be published in next month's Bead Chat Magazine - so I can't reveal any more details until after the publication date. But trust me - I haven't been slacking! Creating with some of these components was quite challenging!! But I love what I came up with ... stay tuned.

In the interim, once I completed all my challenge pieces (I finished on Tuesday, with 3 days to spare!) - I had 2 left over, orphaned, tourmaline nuggets. Some of their gorgeous brothers and sisters had found their way early on into one of my 5x5 challenge designs, and then the remainder of that strand was adopted by one of my dear bloggy friends (*waves at BackstoryBeads*).

Then, late in my challenge design process, I saw a perfect opportunity to use more of the tourmaline nuggets in a second one of my design pieces - their deep teal green color was perfect! Fortunately, I had squirreled away TWO of these strands for myself, so I still had a full strand left. Yay! After completing my piece for the challenge, I still had quite a few left, so I made a matching bracelet and pair of earrings. After all this creating, 2 little nuggets remained - these 2 were a little lopsided, and both were drilled crookedly, so they needed a little special care.

I decided to make a simple spiral rope bracelet, using one as a focal, and the other as a dangle:

 spiral bracelet with tourmaline focal

 spiral bracelet with tourmaline focal

I didn't have any prefabricated beadcaps small enough for this rope (I used 11/0s as the core), so I made my own, with galvanized purple 15/0s. I had forgotten how small 15s are, until I tried to do tubular herringbone with them! But I love the result:

15/0 herringbone beadcaps

I topped the beadcaps with 4mm faceted amethyst rounds.

Making the beadcaps:
beginning of the herringbone beadcap

one beadcap attached, and one orphaned tourmaline nugget, waiting to become a dangle


This bracelet is now available in my Etsy shop!

Sunday, December 30, 2012

Pink and Teal Spiral with Dichroic Glass Pendant


This dichroic glass pendant really captured my imagination - I love the swirling colors, which remind me of sunrise over the Gulf of Mexico - gorgeous pinks and blues, with a hint of gold!

I decided to make a lush spiral rope for this pendant, and chose the plump pink freshwater pearls first. I just love how they bring out the pinks in the glass pendant.

Then I added teal gold, and blue glass seed beads in a variety of sizes and shapes, and I just love the final result:


It's available on Etsy!

Sunday, December 2, 2012

Holiday Lariat

You may have seen this one before - I made this last December, and wore it all the time. I have hauled it out again today - it will be my Holiday "go-to" jewelry, because I love it!


The whole lariat was supposed to be a beadwoven spiral, but I noticed I was running out of the ruby red Czech glass I was using. *Sad face* I made the 2 lengths of spiral rope you see at the ends here, and worked to come up with plan B.

Sometimes these setbacks DO turn out for the better, because I really like the solution I came up with: I incorporated some of my favorite lampwork glass peppermint beads, and had enough of the red Czech glass to do a bit more spiralling, so I made 3 short lengths of spiral rope, which I then strung up asymmetrically with a mix of red and green Czech rondelles plus some larger pressed Czech glass bicones.

I think it's very festive!

Do you have a favorite piece of holiday jewelry?

Monday, November 5, 2012

Peppermint Holiday Spiral Necklace

Here another of those cute lampwork peppermints, and an assortment of other holiday lampwork beads, worked up with a spiral rope to create a gorgeous holiday necklace;


It's the perfect gift for you or someone else special, and it's available on Etsy!


Thursday, November 1, 2012

Peppermint Holiday Spiral Bracelet

These lampwork peppermints were too cute to resist!


I love spirals - and love the holiday colors in this fun bracelet!

Sunday, September 16, 2012

Spiral Rope with Turquoise Heart

I fell in love with this puffy turquoise heart, and fell back on my old standby, the spiral rope, for the necklace. I love weaving spirals with pinch beads - they lie so nicely, and come in such gorgeous colors!
I think this whole piece has a lovely Southwestern look.

And it's available in my Etsy Shop!

Friday, July 13, 2012

Cobalt Spiral with Venetian Glass Focal


I chose blue and gold lampwork beads for this spiral rope necklace, to accentuate the gold and deep cobalt blue in the gorgeous Venetian glass focal bead. Blues are SO hard to photograph - the blue in the focal is pretty true, but the blues in the spiral rope are photographing a little to sapphire-y, when they actually match the blue in the focal bead.

The basic beadwoven spiral is my go-to stitch - it works up quickly, and looks so radically different depending on the beads you choose. Love it!


Friday, May 18, 2012

Bold Beadwoven Spiral

This dichroic glass focal pendant has so much going on - vivid colors, patterns - I love it! I decided it was a strong enough piece to carry off a big, bold spiral, so that is what I designed. I pulled some teals, blues, and golds from the focal, and then added the huge pink freshwater pearls, which give the spiral a dramatic flair.

And it's available on Etsy!

Tuesday, May 8, 2012

Waves on the Beach - a Handwoven Spiral

Sometimes you luck into the most stunning focal beads - like this one. Undulating waves of blues, whites, and browns, with bubbles, and sparkles in the browns - it instantly reminded me of turquoise waves lapping on a sun-kissed sandy beach!
I decided to create a beadwoven spiral rope to pull out the stunning colors in this glass bead. I used several colors and sizes of seed beads, some pinch beads, and some bronze freshwater pearls, and this is the result:


A peyote bail with a pinch bead ruffle acts as a slider for the lampwork focal.

This stunning, summery, beachy necklace is now available in my Etsy shop!

Wednesday, March 28, 2012

Wednesday Worktable

It's Cellini Spiral, still.

When last we visited my Cellini spiral, I had just started connecting the 2 Cellini spiral tubes across the center of the necklace, where I was hanging a gorgeous lampwork focal bead that, IMO, goes perfectly with the spiral:


I have continued to work on this piece on-and-off, between the Florida Road Trip for the Torch Fired Enamel Workshop; doing repairs at the shop; and normal shop duties like taxes, housekeeping, blogging, etc.
Sometime last week I finally finished the center connection to my satisfaction, and I am saving it to show you when I finish the entire necklace.

Once I finished the center, I had a new dilemma - how to create a flexible finish for this necklace? The Cellini tubes are quite stiff, and I experimented with chain, bead stringing, and sari ribbon, but nothing was really right. I decided to try a different beadweaving stitch, and then needed to figure out which one was most compatible, and how to integrate whichever stitch I chose into the Cellini tubes, with their gaping holes!


I ultimately settled on a basic spiral rope, with size 11 seed beads as the core, so that the spiral is "skinny." I wanted it to fit inside the Celllini spiral at the end, and I attached my new skinny spiral to a few beads, sank it inside the Cellini spiral, and then decreased the Cellini spiral until it closed over the new spiral, locking it in place. I chose galvanized silver 11 Delicas for the decrease, because they were the predominant bead in the Cellini spiral, and it seemed like the thing to do. At the time.

Unfortunately, I didn't have any bead caps that were the right size and shape to go over the Cellini spiral, to make the change between stitches attractive and functional. I knew that this transition between the Cellini spiral and the basic spiral was not going to be pretty, but the bright shiny silver Delicas really call attention to it. But I don't believe that any bead I had decreased with would have made a seamless transition. 

So my next mission was to figure out a way to cover up the decrease. Since beadcaps had been ruled out, I thought back to the little freeform peyote ruffled skirts that I had created at the other end of the Cellini spirals (see first picture, above) and decided to replicate them at the decrease end, as a way to cover the decrease.

I worked on these skirts all day yesterday, and by the time I had finished stitching, my planned ruffled skirts had turned into big old Elizabethan collars, but I'm OK with them. (Perhaps because I'm itching to move on to a new project?!?)

Here are several pictures of them, from different angles - it was hard to capture the essence of what I am doing here.


That small tube extending to the left is the start of the "skinny" spiral.


So, I am teaching a beadweaving class right now - taking a break here and there to type this entry - and once the class is over, I will start stitching the spiral ropes. Hope (*crossed fingers*) to finish them today, since they go pretty quickly. Then I want to stitch a toggle and bar, connect them, and be done - and when I finally finish, I will reveal the finished necklace here!

Saturday, January 7, 2012

Oh My Stars!


This design started with some gorgeous 8mm teal matrix jasper beads that I had been hoarding. I didn't really know what I wanted to do with them, and one day I just cut the strand apart, grabbed some Fireline and several coordinating colors of seed beads, and just started playing.

This was a situation where the beads dictated the design, and I started making rounds of circular peyote, and when I "finished", I had a blue-green star. So I made as many of these stars as I could, and then started playing with how to build them into a finished piece.

I noticed that the stars' edges lined up geometrically to produce this pattern, so I started connecting them together, adding some Swarovski crystals for a little "oomph".

Once this piece was joined, I needed to figure out how to turn it into a necklace, and settled on a beadwoven spiral, using the same blue and green seed beads that went into the stars components.

Then I found a perfectly-matching glass toggle, and the result is this striking bib necklace.


And I had 2 stars left over for earrings:

I haven't decided yet what to do with this set; they may go to my Etsy shop, or they may stay in my collection - The bib was such a labor-intensive piece, and these are my favorite colors! Some pieces are SO hard to part with!

Sunday, January 30, 2011

Evolution of a design

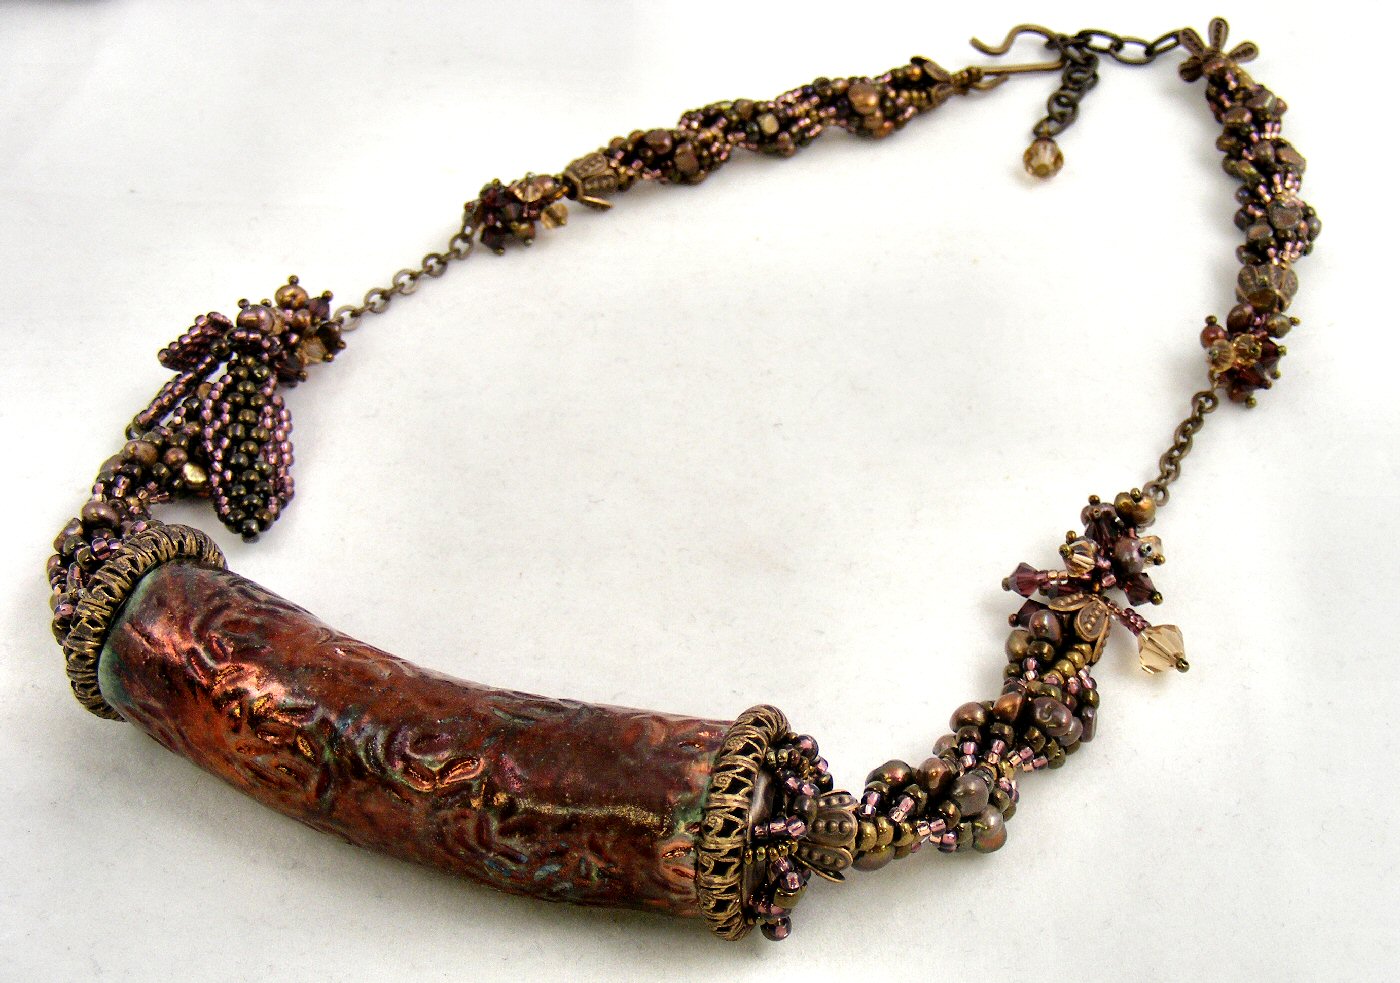
I had this gorgeous, large, burgundy Raku bead, and my original plan was to braid a simple beaded kumihimo rope to suspend it from.

But this design quickly became a study in problem solving, with problem #1 being that I didn't have any matching seed beads in a size that would work up into a beaded kumihimo rope.

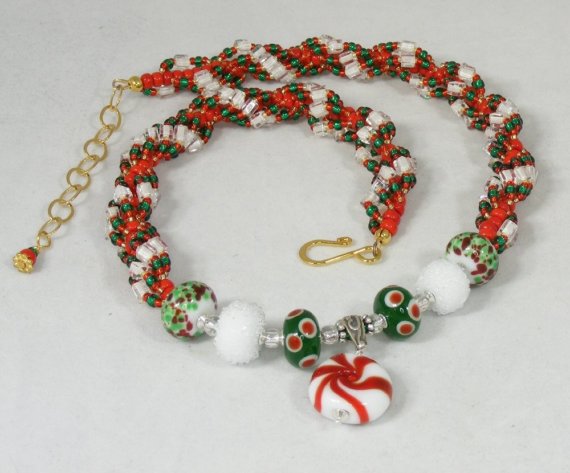
So I decided I would fall back on one of my favorite beadweaving stitches, the spiral.

I had too many bead choices here, and had to play with them, and keep narrowing them down, so that I didn't end up with a overly busy or chunky spiral rope that would overwhelm the bead, despite the bead's size.

Because this raku cylinder bead was huge - almost 4 inches long, with a very large hole running through it.


This is the spiral I finally decided on: brown freshwater pearls, mauve seed beads, burgundy seed beads, olive green seed beads, and copper seed beads for the core. After stitching this 2 inch length, I came upon problem #2: how to cap the large raku bead?

I spent a couple of days working on this beadcap issue. I stitched a number of different attempts from seedbeads, in various sizes, and various patterns, but none of them worked; they needed to be relatively flat on the end, and then immediately flare out pretty widely, and then hug the bead.

And no ready-made beadcaps were anywhere near the size of this bead's end, so I kept stewing, and started looking around for anything I could use to cobble together a suitable beadcap.


I finally found a combination of Vintaj brass findings that I felt, theoretically anyway, could work.  I used metal punch pliers to punch 6 holes in a Vintaj brass ring, to correspond with the placement of the 6 petals on the Vintaj flower.


These are the 3 Vintaj components I finally settled on - the larger ring is a good size for the end of the Raku bead.


Here is how the 3 components stacked in my plan -  now I just had to get them to stay fastened together (and attach them to the bead!)

I made a number of attempts to wire-wrap the components together, but wasn't happy with any of the results.


So I decided to weave the components together with seed beads, and after several more tries, this is the (somewhat over-exposed, sorry) result. 

I then used 20g Vintaj brass wire to wire the caps to the bead, and then attached a length of spiral to each end.  The original plan, after settling on the spiral, was to have the whole necklace be a simple spiral, but by now I had so mych time and energy invested that I decided to glam it up, and added a short length of Vintage brass chain with fringe embeliishment comprised of Swarovski crystals and freshwater pearls to each side, before continuing on with the spiral rope.


Of course, I had to do some more embellishing, so I added fringe to one side, and some freeform peyote leaves to the other.


Then I finished with a Vintaj brass S-hook and extender chain, providing an adjustable finished length.