Couldn't wait to get to the shop this morning to see how the test fire went!
As a reminder, this is the piece before firing (plain glass, not dichroic):
Here's how it looks after firing:
It's not gorgeous, but I didn't expect it to be - I just slapped together some plain glass to see how the temps ran in the kiln.
The blue embellishment pieces sank down into the layer below just beautifully, and the surface is nice and flat. That was the point of firing upside down! Now I can move on to part 2 of the Picasso method: engraving.
I'll be getting out my Dremel, attaching the diamond bits, and practicing on this test piece. I'm worried that my inability to draw is going to be hugely magnified by the vibrations of the Dremel! One wrong move, and the bit will be skating across the surface of the glass, leaving a permanent scratch in the glass where I didn't really want one! Hope I can master my moves on this one piece, because I just filled up the kiln with a batch of dichroic, and now I'm really excited to see how they turn out!
Tomorrow, I'll post pics of the engraving set up and today's results.
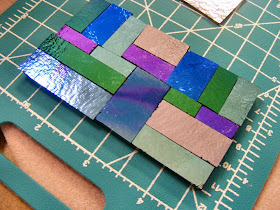
These are the pieces I cut and stacked yesterday:
This is the most elaborate one I have stacked for this technique, and the largest (it's 4" x 2.5"). I used my ring saw to cut the zigzag pieces, which are layered on top as embellishment. Here's how the piece looked before I embellished it:
Once this one is fired, I'll cut it up into smaller pieces after the engraving - I like the idea of having a large pieces to hold while engraving, but unless I want a lot of finished pieces in the same color palette, I'm not sure this is the way to go. But I'll know more tomorrow! (Sure, I could have grouped different colors in different quadrants on this stack, but my obsessive brain wouldn't let me!)
This was a last minute stack:
I was very tired of piecing glass together, mosaic style, but remembered I had some iridized glass I wanted to try. I decided to be lazy, and just use one big piece of it, not even mixing it with a coordinating piece of dichroic - there's a lot of color in the iridized glass, so we'll see how it turns out. I know it doesn't look like much here, but I'm hoping the colors really come out in the firing process.
Off to engrave - see you tomorrow!
Edited to add: Feeling a little stupid right now. The piece I was going to practice engraving on, can't be engraved. Because it isn't black-backed glass. I can engrave the red, or the white, or the blue, glass to my hearts content, but it will never show, because the way engraving works is, the Dremel removes the top (colored) layer of the dichroic glass, leaving the black underneath it as a visible mark. If I engrave the test piece I made, I just reveal the same color underneath when I remove layers. Dumb. This was covered in the class, and it's in my notes, but it didn't sink in until I tried it. Live and learn!


Can you etch and fill the etching in with a contrasting color? I'll admit, I'm not real knowledgeable with glass, but it might have an interesting effect.
ReplyDeleteI love the color combos!
Sam
Thanks, Sam - Since engraving removes glass, the piece has to be firepolished (because the raw glass left behind by the engraving is sharp and rough) - after the firepolishing, there IS some low-fire paint that could be used to color in the etched grooves - I may have to try that some time!
ReplyDeletein some of tanya's work she used some gold paint and then fired - I think its around same temp as firepolishing for the gold - some of the enamels also fire around the 1400 mark you can paint those in too
ReplyDeleteIt'd be cool to try some enamel, although I'd have to take it hotter than firepolish temps.
ReplyDeleteWhen I rewatched the tapes, she said the metal paints (PEBO, or PEBEO, maybe?) fire at 300 degrees - I'll have to search around Michael's and see what I can find.
But I don't have a lot invested in this particular piece - emotionally, or financially!
Ha! LOL - rewatched the "tapes" - that's what we old folks call those new-fangled videos you kids watch!
ReplyDeleteI am amazed by this entire process...so many little steps.
ReplyDelete