Well, it can't always be about the fun beading, folks...today, I have to coil, cut, and tumble several thousand jumprings.
So, we travel back into the deep, dark recesses of my shop, to the back corner of my back room, where my ring-coiling equipment is set up.
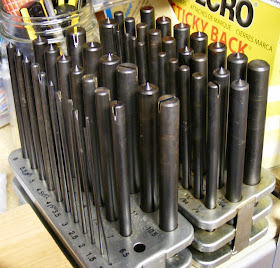
These are my jump ring mandrels. I have an English set and a metric set, because you never know which system a pattern will use (and often, one pattern will mix sizes from both the English and the metric systems, because the sizes ARE slightly different!)
My 6.5mm mandrel is MIA because I pulled it one day to use in lieu of a dowel for a Viking Knit project - couldn't find my dowels anywhere. It's been over a year now .... probably should finish that Viking Knit!
After choosing the correct mandrel, I load it into the coiler and start coiling:
That's my spool of sterling silver wire hanging from the mandrel.
Close-up:
The coiling phase is rough on me, physically. My set up is nice and ergonomic - it is at chest height, so it isn't awkward, and I don't have to bend, stoop, or reach to wind the handle. But, I have to wind that handle one full rotation for every jump ring I coil, and with large batches of rings, that's a lot of strain on my shoulder.
Once all the rings are coiled (which they aren't yet - I had to take a break!), we head out to the classroom, where my saw is set up.
Each coil will be lubricated, then placed in the coil holder, and then cut with the saw blade which is inserted in my Flex Shaft.
And once all the coils are cut, the rings will go into the tumbler for awhile to be polished and work-hardened.
That's Jump Ring 101, and now you know what I'll be doing most of the day!


Very interesting! :-)
ReplyDeleteLike all Your blog posts,which I always read and watch the photos with pleasure.
I've never seen,how that machine work,though I can admit,I've seen such a machinery once:-)
Interesting,what will You be doing next with all those metal elements:-)
Warm Hugs-Halinka-
I love tools and these photos are awesome. Impressed that you make your own jumprings and can make the sizes called for rather than improvise.
ReplyDeleteWow that is a lot of jump rings!!! Chainmaille city LOL!
ReplyDeleteI was cruising the internet looking for a jump ring mandrel set, and I found this post. I'm currently taking classes in metal jewelry making, and I'm looking for some good, easy to use tools. Where did you find your mandrel set? I'm also very intrigued by your holder. It looks like there's a slot to cut the coil, but I'm not getting how you would cut the jump rings if the screws are at the ends. Where did you find it? Thanks for taking the time to answer my questions. Stephanie stefrick@verizon.net
ReplyDeleteStephanie:
ReplyDeleteThe mandrels (both sets) and the Koil winder came from Dave @ Gemstones, Etc (http://www.manta.com/c/mm7jm4x/gemstones-etc). Dave also carries a coil holder, but it only has a small groove, and won't allow for much variability in coil size (and therefore in jump ring diameter)
The coil holder came from Rio Grande - it is item number 110177 (http://www.riogrande.com/Search/jump-ring-coil-holder) - but right now it is saying "unavailable" - I would call Rio to verify, because this is a very popular item. Between the 4 sides, it will hold anything from very very small to ginormous jump ring coils. Very versatile. The holder has a slit in the top for your blade, and a blade stop in the bottom to get the blade to stop before you get to the end where the screw is. THe 2 screws are extremely important to get your coil to hold still while cutting!
Good luck!
Correction @Stephanie - the coil winder in the pic for this post is actually Dave's one-sided coil holder ("Koil Holder") - I quickly discovered I didn't like it, and bought the 4-sided one from Rio. Sorry for the confusion.
ReplyDelete